您现在的位置是:网站首页> PY&Rust
如何用Python开发你的网站
- PY&Rust
- 2024-09-21
- 867人已阅读
如何用Python开发你的网站
python 利用Pyinstaller打包Web项目_python
利用flask,pymsql,实现网页对MySQL进行增加和查看数据的功能
flask中request中form、data、json、values属性
使用web.py构建Web应用
使用Python第三方库:web.py 进行开发
web.py 是一个较为轻量的Python web库,相比于Django开发更加简洁而方便
一、安装和引入 Web.py
安装
pip install web.py
引入
import web
创建一个最基本的网站
一个最基本的 app.py 包含以下几点内容:
#-*- coding: utf-8 -*-
# 文件名:app.py
import web # 引入web.py库
# 表明访问的URL,这里表示的是所有响应,均由 class 对象 index 来响应
# 注:/(.*) 代表的是正则匹配url后面的所有路径,也就是响应任何请求
urls = (
'/(.*)', 'index'
)
# 声明一个名叫app的“应用”
app = web.application(urls, globals())
# 表示 class 对象 index
# 传递参数:self,name(name指url路径/后面的内容)
class index:
# 响应GET请求(声明函数)
def GET(self,name):
# 使用只读,二进制方式打开文件,读取到变量 index_text 中
index_text = open('index.html','rb').read()
# 输出变量 index_text 内的内容,也就是 index.html 内的HTML代码
return index_text
# 当该.py文件被直接运行时,if __name__ == "__main__": 下的代码将被运行
# 当该.py文件作为模块被引入时,if __name__ == "__main__": 下的代码不会被运行
if __name__ == "__main__":
# 运行这个服务器
app.run()
运行 app.py:
root@test-server:/home/muzmn/pystudy# python3 app.py
http://0.0.0.0:8080/
注意: 如果你不能或者不想使用默认端口,你可以使用这样的命令来指定端口号:
$ python app.py 1234
# 返回监听的端口,如上,默认监听的是8080端口
# 我们只要打开 本机IP:8080 就可以打开了
# 如果就在本机上运行,打开 http://127.0.0.1:8080/ 即可
到这里,这个简易的web服务器就完成了,他的作用是访问时读取index.html的内容并输出index.html内的html代码到浏览器
为了方便各位测试,我在这里再附上一个示例 index.html 的代码
<!DOCTYPE html>
<html>
<head>
<meta charset="UTF-8">
<meta name="viewport" content="width=device-width, initial-scale=1.0">
<title>test</title>
</head>
<body>
<h1>Web.py 真係好方便</h1>
</body>
</html>
HTML模板
我们开发除了API外,HTML也是常用,在templates文件夹下创建一个名称叫做hello.html的文件。
$def with (content)
<html>
<body>
<p>识别结果:$content</p>
</body>
</html>
hello.html的名称很重要,和下面的render.hello是对应的,$content是传入的参数名称。
import web
urls = (
'/upper_html/(.*)', 'upper_html'
)
app = web.application(urls, globals())
render = web.template.render('templates/')
class upper_html:
def GET(self, text):
print('input:' + text)
return render.hello(content=text.upper())
if __name__ == "__main__":
app.run()
图片、js、css等静态资源的引用
在images目录下放一张image.jpg的图片
修改HTML
$def with (content)
<html>
<body>
<p>识别结果:$content</p>
<img src="/images/image.jpg" width="400">
</body>
</html>
修改python代码,下面增加的代码的意思是,把包含js、css、images路径的请求,返回静态资源,但是通常建议使用nginx来实现静态资源。
import web
urls = (
'/upper_html/(.*)', 'upper_html',
'/(js|css|images)/(.*)', 'static'
)
app = web.application(urls, globals())
render = web.template.render('templates/')
class upper_html:
def GET(self, text):
print('input:' + text)
return render.hello(content=text.upper())
class static:
def GET(self, media, file):
try:
f = open(media+'/'+file, 'rb')
return f.read()
except:
return ''
if __name__ == "__main__":
app.run()
项目结构
├── images
│ └── image.jpg
├── templates
│ └── hello.html
├── web_demo.py
web.py 自定义端口
通过 runsimple进行自定义
import web
urls = ('/(.*)','hello')
class MyApplication(web.application):
def run(self, port=8080, *middleware):
func = self.wsgifunc(*middleware)
return web.httpserver.runsimple(func, ('0.0.0.0', port))
class hello:
def GET(self,name):
if not name:
name = "112"
return 'Hello, ' + name + '!'
if __name__ == "__main__":
app = MyApplication(urls, globals())
app.run(port=8988)
通过 args 传参进行自定义
import web
urls = ('/(.*)','hello')
app = web.application(urls, globals())
class hello:
def GET(self,name):
if not name:
name = "112"
return 'Hello, ' + name + '!'
if __name__ == "__main__":
app.run()
# python test.py 3032
python 利用Pyinstaller打包Web项目_python
最近需要用python打包一个单页面网页demo,于是准备用python包pyinstaller来打包程序。网上搜索了一下,大部分教程都是打包非web项目,这里分享一下打包简单网页demo的过程。
系统环境:win10+python3.6
一、安装pyinstaller
pip install pyinstaller
二、打包项目
1.如果是单文件项目,pyinstaller可以通过简单的命令进行python代码的打包工作,其命令为:
pyinstaller -option ***.py
1.1参数option可以有多个值:
-F : 指定打包后只生成一个exe格式的文件
-D : 生成一个文件目录包含可执行文件和相关动态链接库和资源文件等(默认选项)
-c : –console, –nowindowed 使用控制台,无界面(默认选项)
-w : –windowed, –noconsole 使用窗口,无控制台
1.2注意
①再增加一个命令参数 -w 可以保证点击生成的exe文件不会弹出黑色控制台窗口
②不加 -F 参数会生成一堆文件,但是运行速度快; 加-F参数生成一个exe文件,运行起来慢
2.如果不是单文件项目,而是有多级目录(包含一些依赖的静态资源),需要自定义打包
本文以打包自己的单页面网页demo为例,各级目录结构如下:
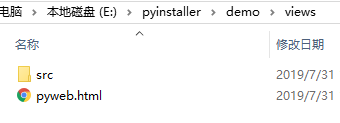

2.1为了进行自定义配置打包,需要先输出配置文件.spec文件,执行命令:
pyi-makespec -D -w main.py
注:
-w 参数是为了保证不会产生黑色控制台窗口
-D 参数生成一个文件目录包含可执行文件和相关动态链接库和资源文件等(默认选项,也可以不加)
生成的 main.spec 文件如下:
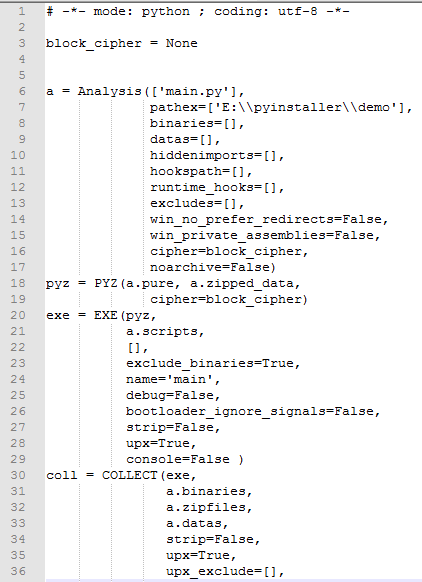
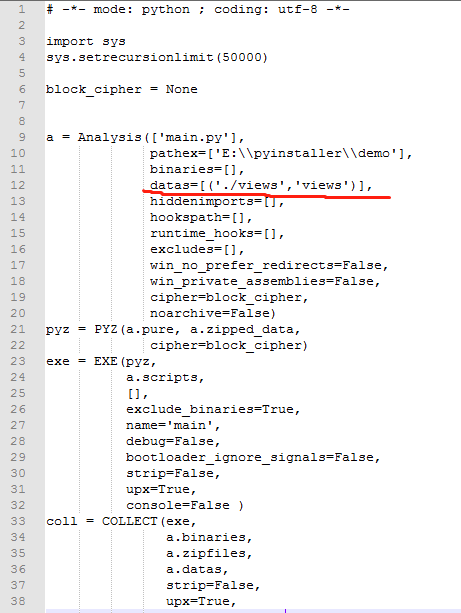
2.2为了是使打包生成后的exe文件可以加载css、js、图片等静态资源,这里需要添加依赖路径(注意:要保证自己 html 里面加载静态资源的路径是相对路径才行)。具体来说,此类资源文件的打包需要设置Analysis的datas,如下:
2.3执行打包命令:
pyinstaller main.spec
成功!
最终结果:
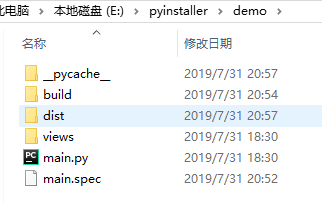
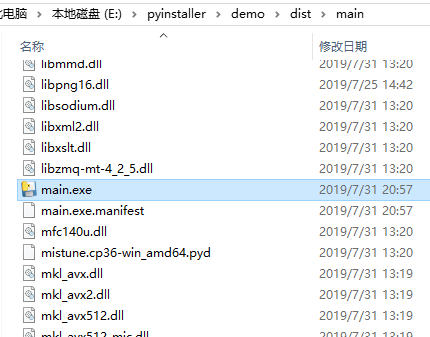
3.一些报错
①执行打包命令时,报错:RecursionError: maximum recursion depth exceeded
原因:应该是python库递归遍历太深,超过了python预设的递归深度,导致出现 “RecursionError: maximum recursion depth exceeded" 的错误
解决办法:在spec文件里设置一个大点的递归深度,在该文件第二行,添加代码如下:
import sys
sys.setrecursionlimit(50000)
②python打包pywebview时,可能会报错:WebBrowserInterop.x64.dll not found
原因:这是由于系统没有找到WebBrowserInterop.x64.dll
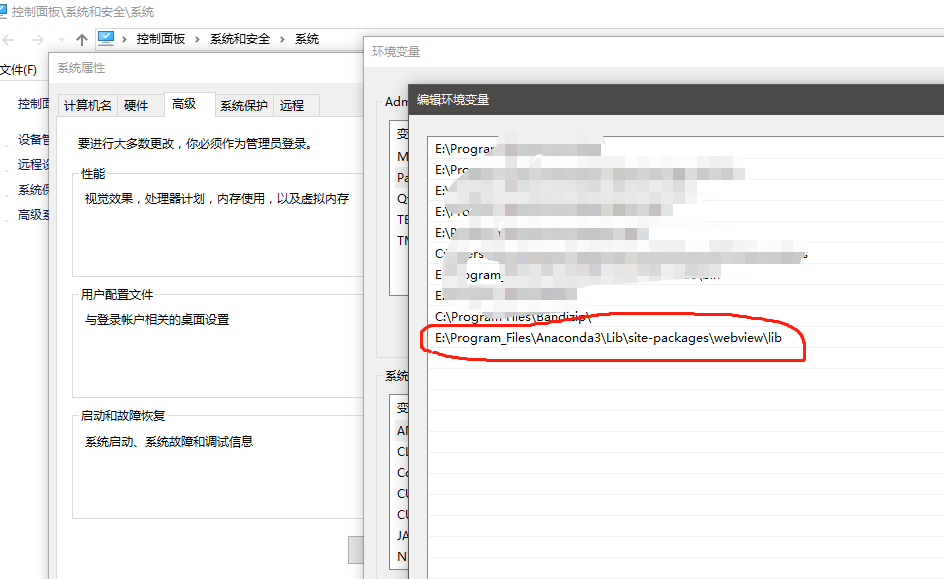
解决办法:将WebBrowserInterop.x64.dll文件的所在路径添加到系统环境变量里即可!
WebBrowserInterop.x64.dll文件的所在路径:

添加到系统环境变量:
4.注意事项
①如果生成的exe文件双击无法正常运行,也没有报错提示,此时,如果想看具体报错信息,就不要直接双击执行,而是在控制台下执行。如果这样还是无法看到报错信息,则在打包软件时不要使用 -w 参数,这样在运行生成的exe时就可以弹出黑色控制台窗口,从而就可以在黑色控制台上面看到报错信息
②如果要减小打包体积,可以使用conda创建python虚拟环境,然后只安装需要的包,最后再进行打包,这样体积会大大减小
web.py文件上传实例
都说Django是重量级的web框架,而web.py是轻量级的,django给我印象最深刻的还是它的admin管理,由于是django自带的,其它方面还没看出来怎么样,但是web.py也很有趣,写起应用来,短小而精悍。
官网上有一个文件上传的示例程序,代码如下:
import web
urls = ('/upload', 'Upload')
class Upload:
def GET(self):
web.header("Content-Type","text/html; charset=utf-8")
return """<html><head></head><body>
<form method="POST" enctype="multipart/form-data" action="">
<input type="file" name="myfile" />
<br/>
<input type="submit" />
</form>
</body></html>"""
def POST(self):
x = web.input(myfile={})
filedir = '/path/where/you/want/to/save' # change this to the directory you want to store the file in.
if 'myfile' in x: # to check if the file-object is created
filepath=x.myfile.filename.replace('\\','/') # replaces the windows-style slashes with linux ones.
filename=filepath.split('/')[-1] # splits the and chooses the last part (the filename with extension)
fout = open(filedir +'/'+ filename,'w') # creates the file where the uploaded file should be stored
fout.write(x.myfile.file.read()) # writes the uploaded file to the newly created file.
fout.close() # closes the file, upload complete.
raise web.seeother('/upload')
if __name__ == "__main__":
app = web.application(urls, globals())
app.run()
(html文字还是模板的形式比较好)。
在windows下小试了一把,发现在上传中文名文件时会出现乱码,以为是程序的编码出问题了,于是把程序的编码改成了uft8,在程序开头加了几句
default_encoding = 'utf-8'
if sys.getdefaultencoding() != default_encoding:
reload(sys)
sys.setdefaultencoding(default_encoding)
结果还是不行,纳闷了,于是查看了一下文件名保存后的编码方案,还是utf-8,由于我是在xp运行的,文件上传保存在本机上,这下找着原因了,原来是windows不认识utf-8编码的汉字了,于是加上一句
filename = filename.encode("gb2312")
结果汉字就是汉字了,没有乱码。看来文字的编码方式在网络传输中很重要。这让我想到了协议,类似于printf函数参数入栈顺序,printf的参数是从左到右入栈,而printf的函数调用方以从右至左的入栈顺序去识别它,那肯定就会出错了,一点联想。
关于文字编码的问题我已经遇到不止一次了,前有mysql不能正常显示汉字,php页面文字乱码,还是unicode好,一统天下了,不过貌似浪费了很多空间。嗯,编码方案,要再细细研究研究。
Flask快速入门
一、简单的flask框架
from flask import Flask
#给Flask一个实例化对象,其中__name__入参是你的模块名或者包名,Flask应用会根据这个来确定你的应用路径以及静态文件和模板文件夹的路径
app = Flask(__name__)
#路由
@app.route('/')
def hello_world():
return 'Hello World!'
#运行
if __name__ == '__main__':
app.run()
falsk获取参数的方式
request.form.get("key", type=str, default=None)
request.args.get("key") # 获取get请求参数
request.values.get("key") # 获取所有参数
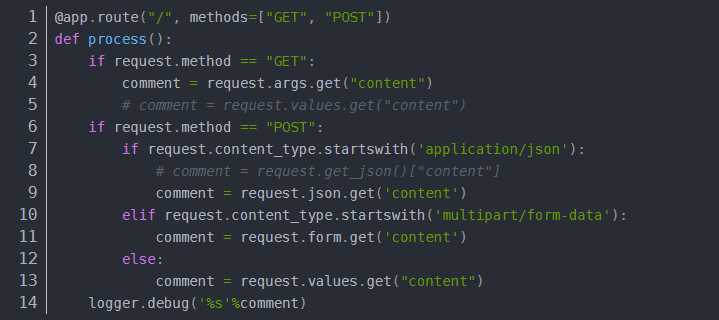
POST请求不同Content-Type的处理方式
Content-Type为 application/json,获取json参数

两种路由方式
调用add_url_route()为函数指定一个路由
def test():
return 'this is test'
app.add_url_route('/test',view_func=test)
用 route 装饰器将一个url规则绑定到一个视图函数上
@app.route('/test')
def test():
return 'this is test'
动态路由
要给 URL 添加变量部分,你可以把这些特殊的字段标记为 , 这个部分将会作为命名参数传递到你的函数。规则可以用 指定一个可选的转换器
@app.route('/user/<username>')
def show_user_profile(username):
# show the user profile for that user
return 'User %s' % username
@app.route('/post/<int:post_id>')
def show_post(post_id):
# show the post with the given id, the id is an integer
return 'Post %d' % post_id
转换器有下面几种: int 接受整数 float 接受浮点数 path 和默认的相似,但接受斜线
添加HTTP方法
HTTP有许多不同的访问 URL 方法。默认情况下,路由只回应 GET 请求,但是通过 route() 装饰器传递 methods 参数可以改变这个行为。例如:
@app.route('/login', methods=['GET', 'POST'])
def login():
if request.method == 'POST':
do_the_login()
else:
show_the_login_form()
客户端:
import requests
user_info = {'name': 'letian', 'password': '123'}
r = requests.post("http://127.0.0.1:5000/register", data=user_info)
print(r.text)
服务端:
from flask import Flask, request
app = Flask(__name__)
@app.route('/')
def hello_world():
return 'hello world'
@app.route('/register', methods=['POST'])
def register():
print(request.headers)
# print(request.stream.read()) # 不要用,否则下面的form取不到数据
# file_obj = request.files.get('excel')
print(request.form)
print(request.form['name'])
print(request.form.get('name'))
print(request.form.getlist('name'))
print(request.form.get('nickname', default='little apple'))
return 'welcome'
if __name__ == '__main__':
app.run(port=5000, debug=True)
/*获得json
data = request.get_data()
json_data = json.loads(data.decode("UTF-8"))
DeploymentID = json_data.get("DeploymentID")
Gitlab_URL = json_data.get("Gitlab_URL")
basics_URL = json_data.get("basics_URL")
*/
Flask session详细用法
from flask import Flask,session
app=Flask(__name__)
app.config['SESSION_KEY']='XXXXXX'
#或 app.secret_key='xxxxxxx'
操作session ----与操作字典相同
#增
session['username']='helloWorld'
#查
result=session['key'] ###如果key不存在,会raise Error
result=session.get('key') ###如果key不存在,返回None
#删
session.pop('key')
#清空session
session.clear
设置session的过期时间
如果没有指定session的过期时间,默认是浏览器关闭以后就自动结束
session.permanent=True在flask下可以将有效期延长至一个月
给app.config设置PERMANENT_SESSION_LIFETIME来更改有效期,这个值的数据类型是datetime.timedelta类型。在登陆网页界面的时候,有个‘记住我’的选项,如果点击了就把session的有效期延长一些,使用的就是这个。前提是要session.permanent=True
from flask import Flask,session
from datetime import timedelta
import os
app=Flask(__name__)
app.config['SECRET_KEY']=os.urandom(24)
session.permanent=True
app.config['PERMANENT_SESSION_LIFETIME']=datetime.timedelta(days=7)
Flask——cookie的使用
Flask的cookie设置有多种方式,以下简述基本的使用方法:
1.cookie的设置方法
(1)使用set_cookie() 方法进行设置:
from flask import Flask,make_response
app = Flask(__name__)
# 设置cookie
@app.route("/set_cookies")
def set_cookies():
# 设置响应体
resp = make_response("success")
# 设置coolie,默认有效期是临时cookie,浏览器关闭就失效
resp.set_cookie("itcast","Python")
resp.set_cookie("itcast1","Python1")
# max_age设置有效期,单位:秒
resp.set_cookie("itcast2","Python2",max_age=3600)
return resp
if __name__ == '__main__':
app.run(debug = True,port=8000)
(2)使用响应头进行设置:
from flask import Flask,make_response
app = Flask(__name__)
# 设置cookie
@app.route("/set_cookies")
def set_cookies():
# 设置响应体
resp = make_response("success")
resp.headers["Set-Cookie"] = "itcast1=Python_1; Expires=Sun, 07-Nov-2021 08:19:37 GMT; Max-Age=3600; Path=/"
return resp
if __name__ == '__main__':
app.run(debug = True,port=8000)
2.获取cookie值(要先设置再进行获取):
这里要先导入request库:
from flask import request
1
执行上述操作后获取cookie:
from flask import Flask,make_response,request
app = Flask(__name__)
# 设置cookie
@app.route("/set_cookies")
def set_cookies():
# 设置响应体
resp = make_response("success")
# 设置coolie,默认有效期是临时cookie,浏览器关闭就失效
resp.set_cookie("itcast","Python")
resp.set_cookie("itcast1","Python1")
# max_age设置有效期,单位:秒
resp.set_cookie("itcast2","Python2",max_age=3600)
return resp
# 获取cookie
@app.route("/get_cookies")
def get_cookies():
response = request.cookies.get("itcast")
# print(type(response)) # 类型为:str
return response
if __name__ == '__main__':
app.run(debug = True,port=8000)
3.删除cookie:
使用**delete_cookie()**方法删除过期的cookies,代码如下:
from flask import Flask,make_response,request
app = Flask(__name__)
# 设置cookie
@app.route("/set_cookies")
def set_cookies():
# 设置响应体
resp = make_response("success")
# 设置coolie,默认有效期是临时cookie,浏览器关闭就失效
resp.set_cookie("itcast","Python")
resp.set_cookie("itcast1","Python1")
# max_age设置有效期,单位:秒
resp.set_cookie("itcast2","Python2",max_age=3600)
return resp
# 获取cookie
@app.route("/get_cookies")
def get_cookies():
c = request.cookies.get("itcast")
print(type(c)) # 类型为:str
return c
# 删除cookies
@app.route("/delete_cookies")
def delete_cookies():
resp = make_response("del success")
# 删除(过期)cookies
resp.delete_cookie("itcast2")
return resp
if __name__ == '__main__':
app.run(debug = True,port=8000)
二、flask框架的路由methods方法,默认为GET
from flask import Flask
app = Flask(__name__)
@app.route('/user',methods=['POST'])
def hello_user():
return 'hello user
三、flask框架参数传递的两种方法
在路由中传递参数
在request实例对象中获取参数
在路由中传递参数
from flask import Flask
app = Flask(__name__)
@app.route('/users/<id>')
def users_id(id):
return 'users id:' + id
#访问127.0.0.1/users/12334
#id为12334
在路由中传参我们访问的时候的是“/参数"
在request实例对象中获取参数
from flask import Flask,request
app = Flask(__name__)
@app.route('/query_id')
def query_id():
id = request.arg.get('id')
return 'query id:' + id
#访问127.0.0.1/query_id?id=12334
request实例对象传参访问的时候是”?参数=xxxx“
四、flask框架的反向路由
from flask import Flask,url_for
app = Flask(__name__)
@app.route('/query_url')
def query_url():
return 'query url:' + url_for('users_id')
反向路由用的是url_for('返回的函数')
Flask的模板
更改用户信息,上传文件
# 更新用户信息
from flask import request, render_template, redirect, session, url_for, jsonify, current_app
from . import test_blue
from flask_teach import db, models, redis_store
# 引入装饰器
from flask_teach.decorators import decorator_login
from flask_teach.common import random_num
......
# 用户信息视图
@test_blue.route('/user_message', methods=['GET', 'POST'])
@decorator_login
def user_update():
# 获取用户名
name = session.get('name')
# 获取用户对象
user = models.Test.query.filter_by(name=name).first()
# 将用户对象装换成用户字典
user_dict = user.to_dict()
# 根据请求方式不同做出不同的响应
if request.method == 'GET':
return render_template('test/user_message.html', user=user_dict)
else:
name = request.form['name']
sex = request.form['sex']
avatar = request.files.get('avatar')
# 如果上传了头像才保存和更新数据库的头像信息
if avatar:
# 设置头像存储路径
absolute_avatar_path = current_app.static_folder + '/avatar/{}.png'.format(name)
# 保存图片
with open(absolute_avatar_path, 'wb+') as f:
f.write(avatar.read())
f.close()
user.avatar_url = absolute_avatar_path
# 更新用户信息
user.name = name
user.sex = sex
# 更新session的name
session['name'] = name
# 将更新后的对象装换成字典
user_dict = user.to_dict()
# 返回更新结果
return render_template('test/user_message.html', user=user_dict)
编写模板 user_message.html
<!DOCTYPE html>
<html>
<head>
<meta charset="UTF-8">
<title>用户信息</title>
<script src="../../static/js/jquery-3.6.0.min.js"></script>
<style>
img {
width: 100px;
height: 100px;
}
</style>
</head>
<body>
<img src="/test/user_avatar" alt="" id="avatar_img">
<form action="/test/user_message" enctype="multipart/form-data" method="post">
用户头像:<input type="file" name="avatar" id="avatar"><br>
用户名:<input type="text" value="{{user.name}}" name="name"><br>
性别:
{% if user.sex== '男' %}
<input type="radio" value="男" checked name="sex">男
<input type="radio" value="女" name="sex">女
{% else %}
<input type="radio" value="男" name="sex">男
<input type="radio" value="女" checked name="sex">女
{% endif %}
<br>
<input type="submit" value="提交">
</form>
<a href="/test/index">返回首页</a>
<script>
$(function () {
// 头像预览
$('#avatar').change(function () {
// 1.创建文件阅读器对象
let avatar_img = new FileReader()
// 2.获取用户上传的文件对象
let up_avatar = $(this)[0].files[0];
// 3.将文件对象交给阅读器对象解析
avatar_img.readAsDataURL(up_avatar)
// 4.等待文件阅读器加载完毕,利用文件阅读器将文件展示到前端页面,修改src属性,
// avatar_img.result 获取图像路径
avatar_img.onload = function () {
$('#avatar_img').attr('src', avatar_img.result)
}
})
})
</script>
</body>
</html>
了解完路由的基本使用后,我们说说Flask的模板~
基本内容
模板的简单使用
条件语句
循环语句
模板的继承
一、模板的简单使用
from flask import Flask,render_template
app = Flask(__name__)
@app.route('/')
def hello_world():
return render_template('index.html')
创建一个文件夹用来存放index.html静态模板
<!DOCTYPE html>
<html>
<head>
<meta charset="UTF-8">
<title>template</title>
</head>
<body>
<h1>hello world!</h1>
</body>
</html>
这里我们可以看到和hello world!和之前在学简单的Hello world!效果一样,不过这里我们用的是一个html文件来展示的。
使用模板语法
from flask import Flask,render_template
app = Flask(__name__)
@app.route('/')
def hello_world():
content = 'hello,world!'
return render_template('index.html',content=content)
静态文件index.html
<!DOCTYPE html>
<html>
<head>
<meta charset="UTF-8">
<title>template</title>
</head>
<body>
<h1>{{content}}</h1>
</body>
</html>
这里看到的也是hello world!只不过我们将静态文件的内容藏起来了,通过后端返回的内容再显示出来,用的是模板语法,两种方法在前端显示的都一样。但是更加复杂的如何展示呢?我们写一些简单的逻辑语句。
将需要传递的参数写入models.py
class User:
def __init__(self,user_id,user_name):
self.user_id = user_id
self.user_name = user_name
编写后端flaskapp.py
from flask import Flask,render_template
from models import User
app = Flask(__name__)
#引用模板
@app.route('/')
def hello_world():
content = 'hello world!'
return render_template('index.html',content=content)
#引用自己写的models.py中的类
@app.route('/user')
def user_index():
user = User(1,'李明')
return render_template('user_index.html',user=user)
if __name__ == '__main__':
app.run()
这里我们写了一个函数用来调用models.py中的类,再将它传给前端展示。
编写user_index.html静态文件
<!DOCTYPE html>
<html>
<head>
<meta charset="UTF-8">
<title>user</title>
</head>
<body>
<h1>hello {{user.user_name}}</h1>
</body>
</html>
user_index.html静态文件文件中我们使用模板语法来获取实例对象。
二、条件语句
如何在模板中使用条件语句呢?
<!DOCTYPE html>
<html>
<head>
<meta charset="UTF-8">
<title>条件语句</title>
</head>
<body>
{% if user.user_id == 1 %}
<h1> Hello {{user.name}}</h1>
{% else %}
<h1>This no user!</h1>
{% endif %}
</body>
</html>
创建info.html静态文件,使用用模板语法if......elseif......
from flask import Flask,render_template
from models import User
app = Flask(__name__)
#路由
@app.route('/info/<user_id>')
def info_judge(user_id):
user = None
if int(user_id) == 1:
user = User(1,'李明')
return render_template('info.html',user=user)
这里我们写了一个函数进行判断如果参数为1,就返回user.user_name;如果不为1,就返回”This no user!“。
三、循环语句
如何在模板中使用循环语句呢?
<!DOCTYPE html>
<html>
<head>
<meta charset="UTF-8">
<title>循环语句</title>
</head>
<body>
{% for user in users %}
<h3>{{user.user_id}}----{{user.user_name}}</h3><br>
{% endfor %}
</body>
</html>
创建list.html静态文件
from flask import Flask,render_template
from models import User
#路由
@app.route('/list')
def list_range():
users = []
for i in range(10):
user = User(i,'学'+str(i))
users.append(user)
return render_template('list.html',users=users)
创建flaskapp.py,引入循环模板语法
四、模板的继承
模板的继承是什么?我们会发现有一些网页的有些部分是不变的,当跳转相同网页的时候只有中间部分会改变,这种效果该如何展现出来呢?这就要使用到模板的继承。接下来我将给个例子说明这个问题。
<!DOCTYPE html>
<html>
<head>
<meta charset="UTF-8">
<title>模板的继承</title>
</head>
<body>
<div>
Header 欢迎光临!
</div>
{% block content %}
{% endblock %}
<div>
Footer 欢迎下次再来!
</div>
</body>
</html>
创建base.html
{% extend block %}
<h3>{{content}}</h3>
{% endblock %}
创建one_page.html
{% extend block %}
<h3>{{content}}</h3>
{% endblock %}
创建secend_page.html
from flask import Flask,render_template
#第一页路由
@app.route('/one_page')
def one_page():
content = '这是第一页!'
return render_template('one_page.html',content=content)
#第二页路由
@app.route('/secend_page')
def secend_page():
content = '这是第二页!'
return render_template('secend_page.html',content=content)
创建flaskapp.py
运行flaskapp.py我们发现改变url路径(/one_page,secend_page)只有中间部分会发生改变。
Flask消息提示与异常捕获
基本内容
消息提示
异常捕获
异常处理
??Flask的消息提示
问题引出:我们在登录一个网站的时候,第一栏是账号,第二栏是密码,这个是最基本的登录方式,有的可能会加上验证码。当我们什么都不输入时,点击登录按钮,网页会提示“请输入账号“;当我们输入账号时,点击登录,网页会提示”请输入密码“;当我们输入错误的账号密码时,网页会提示”您输入的密码或账号有误“;当我们输入正确的账号密码时,网页自动跳转到登录后的页面。这四种消息提示是我们登录遇到过的最基本的情况,如何用Flask的消息提示把它展示出来呢?接下来我将用代码来展示这四种消息提示。
from flask import Flask,render_template,flash,request
app = Flask(__name__)
#对flash的内容加密
app.secret_key = '123'
#路由
@app.route('/login',methods=['POST'])
def login():
#获取表单上传的数据
form = request.form
username = form.get('username')
password = form.get('password')
#进行判断
if not username:
flash("亲,请输入账号")
return render_template("index.html")
if not password:
flash("亲,请输入密码")
return render_template("index.html")
if username == "xiaojiu" and password == "12345":
flash("login success")
return render_template("index.html")
else:
flash("亲,您输入的账号或密码有误!")
return render_template("index.html")
#运行
if __name__=="__main__":
app.run()
flaskapp.py
<!DOCTYPE html>
<html>
<head>
<meta charset="UTF-8">
<title>Flask消息提示与异常捕获</title>
</head>
<body>
<h1>Login</h1>
<form action="/login" method="post">
<input type="text" name="username" placeholder="账号"><br />
<input type="password" name="password" placeholder="密码" style="margin-top:10px"><br />
<input type="submit" value="Submit" style="margin-left:50px;margin-top:10px">
</form>
<!--这里获取的是一个数组-->
{{get_flashed_messages()[0]}}
</body>
</html>
index.html文件
??Flask的异常捕获以及异常处理
问题提出:当我们访问一个网站的时候不小心把它的路径名称写错了,此时网页将显示的是什么呢?404 notfound?还是别的呢?我们又如何处理这种情况呢?
首先,如果创建网站的人没有设置异常捕获及处理它会出现404;如果处理了的话,那就显示的为处理后的页面。
所以,我们的异常处理也就是对返回的404页面返回我们设置的页面。
from flask import Flask,render_template,abort
app = Flask(__name__)
#异常捕获一
@app.errorhandler(404)
def NotFound():
return render_template("404.html")
#异常捕获二
@app.route('/user/<user_id>')
def user_info(user_id):
if int(user_id) == 1:
return render_template("user.html")
else:
abort(404)
if __name__=="__main__":
app.run()
flaskapp.py
<!DOCTYPE html>
<html>
<head>
<meta charset="UTF-8">
<title>Flask异常捕获与处理</title>
</head>
<body>
<h2>抱歉,你访问的页面去火星了......</h2><br />
<h2>请检查你的网址是否输入正确哦!</h2>
</body>
</html>
404.html文件
<!DOCTYPE html>
<html>
<head>
<meta charset="UTF-8">
<title>Title</title>
</head>
<body>
<h1>User</h1>
</body>
</html>
user.html文件
Flask修改IP和端口
from flask import Flask
#给Flask一个实例化对象,其中__name__入参是你的模块名或者包名,Flask应用会根据这个来确定你的应用路径以及静态文件和模板文件夹的路径
app = Flask(__name__)
#路由
@app.route('/')
def hello_world():
return 'Hello World!'
#运行
if __name__ == '__main__':
app.run(host='127.0.0.1', port=5556)
# run(host, port, debug, **options)
# host要监听的主机名。 默认为127.0.0.1(localhost)。设置为“0.0.0.0”以使服务器在外部可用
# port 端口号 默认5000
# debug 提供调试信息 TRUE 为提供
Flask Https站点部署
from flask import Flask
app = Flask(__name__)
app.run(ssl_context=('your_path/server.crt', 'your_path/server.key'))
Flask文件上传
在 Flask 中处理文件上传非常简单。它需要一个 HTML 表单,其 enctype 属性设置为“multipart/form-data”,将文件发布到 URL。
URL 处理程序从 request.files[] 对象中提取文件,并将其保存到所需的位置。
每个上传的文件首先会保存在服务器上的临时位置,然后将其实际保存到它的最终位置。
目标文件的名称可以是硬编码的,也可以从 request.files[file] 对象的 filename 属性中获取。
但是,建议使用 secure_filename() 函数获取它的安全版本。
可以在 Flask 对象的配置设置中定义默认上传文件夹的路径和上传文件的最大大小。
app.config['UPLOAD_FOLDER'] 定义上传文件夹的路径
app.config['MAX_CONTENT_LENGTH'] 指定要上传的文件的最大大小(以字节为单位)
以下代码具有 '/upload' URL 规则,该规则在 templates 文件夹中显示 'upload.html',以及 '/upload-file' URL 规则,用于调用 uploader() 函数处理上传过程。
'upload.html' 有一个文件选择器按钮和一个提交按钮。
<html>
<head>
<title>File Upload</title>
</head>
<body>
<form action="http://localhost:5000/uploader" method="POST" enctype="multipart/form-data">
<input type="file" name="file" />
<input type="submit" value="提交" />
</form>
</body>
</html>
您将看到如下所示的界面。
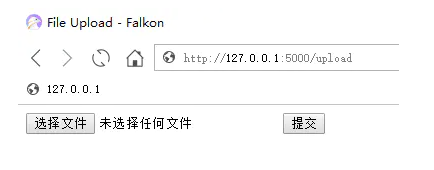
选择文件后,单击提交。
表单的 post 方法调用 '/upload_file' URL。
底层函数 uploader() 执行保存操作。
以下是 Flask 应用程序的 Python 代码。
from flask import Flask, render_template, request
from werkzeug.utils import secure_filename
import os
app = Flask(__name__)
app.config['UPLOAD_FOLDER'] = 'upload/'
@app.route('/upload')
def upload_file():
return render_template('upload.html')
@app.route('/uploader',methods=['GET','POST'])
def uploader():
if request.method == 'POST':
f = request.files['file']
print(request.files)
f.save(os.path.join(app.config['UPLOAD_FOLDER'], secure_filename(f.filename)))
return 'file uploaded successfully'
else:
return render_template('upload.html')
if __name__ == '__main__':
app.run(debug=True)
注意:app.config['UPLOAD_FOLDER'] = 'upload/'
upload 前面不能加“/”。
上传成功会显示以下画面:
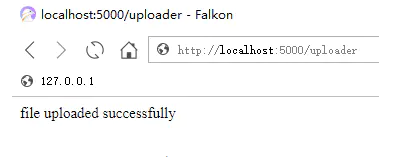
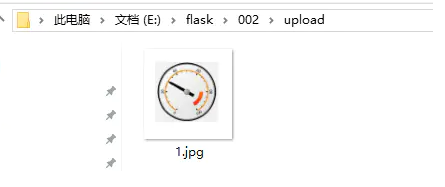
上次文件被放到根目录的 upload 文件夹下:
利用flask,pymsql,实现网页对MySQL进行增加和查看数据的功能
app.py
from flask import Flask, render_template, request
import pymysql
app = Flask(__name__)
@app.route("/add/user", methods=["GET", "POST"])
def add_user():
if request.method == 'GET':
return render_template("add_user.html")
username = request.form.get("user")
password = request.form.get("pwd")
mobile = request.form.get("mobile")
# 1.连接MySQL
conn = pymysql.connect(host="127.0.0.1", port=3306, user='root', passwd="123456", charset='utf8', db='unicom')
cursor = conn.cursor(cursor=pymysql.cursors.DictCursor)
# 2.提交SQL语句
sql = "insert into admin(username,password,mobile) values(%s,%s,%s)"
cursor.execute(sql, [username, password, mobile])
conn.commit()
# 3.关闭SQL连接
cursor.close()
conn.close()
return "success"
@app.route("/show/user")
def show_user():
######获取所有信息#######
# 1.连接MySQL
conn = pymysql.connect(host="127.0.0.1", port=3306, user='root', passwd="123456", charset='utf8', db='unicom')
cursor = conn.cursor(cursor=pymysql.cursors.DictCursor)
# 2.提交SQL语句
sql = "select * from admin"
cursor.execute(sql)
data_list = cursor.fetchall()
# 3.关闭SQL连接
cursor.close()
conn.close()
print(data_list)
return render_template("show_user.html", data_list=data_list)
if __name__ == '__main__':
app.run()
add_user.html
<!DOCTYPE html>
<html>
<head>
<meta charset="UTF-8">
<title>Title</title>
</head>
<body>
<h1>添加用户</h1>
<form method="post" action="/add/user">
<input type="text" name="user" placeholder="用户名">
<input type="text" name="pwd" placeholder="密码">
<input type="text" name="mobile" placeholder="手机号">
<input type="submit" value="提交">
</form>
</body>
</html>
show_user.html
<!DOCTYPE html>
<html>
<head>
<meta charset="UTF-8">
<title>Title</title>
<link rel="stylesheet" href="/static/plugins/bootstrap-3.4.1-dist/css/bootstrap.css">
</head>
<body>
<div>
<h1>用户列表</h1>
<table border="1" class="table table-bordered">
<thead>
<tr>
<th>ID</th>
<th>姓名</th>
<th>密码</th>
<th>手机号</th>
</tr>
</thead>
<tbody>
{% for item in data_list %}
<tr>
<td>{{ item.id }}</td>
<td>{{ item.username }}</td>
<td>{{ item.password }}</td>
<td>{{ item.mobile }}</td>
</tr>
{% endfor %}
</tbody>
</table>
</div>
<script src="static/js/jquery-3.6.0.min.js"></script>
<script src="static/plugins/bootstrap-3.4.1-dist/js/bootstrap.js"></script>
</body>
</html>
Flask json操作
使用json库返回json响应数据
@app.route('/test1', methods=["GET", "POST"])
def test1():
data = {
"name": "mjl",
"age": 21,
}
res_json = json.dumps(data)
return res_json, 200, {"Content-Type":"application/json"}
使用jsonify返回json响应数据(推荐使用)
from flask import jsonify
@app.route('/test2', methods=["GET", "POST"])
def test2():
data = {
"name": "mjl",
"age": 21,
}
return jsonify(data)
jsonify
不单单可以将dict转为json响应数据,还可以直接往里面写参数值
@app.route('/test3', methods=["GET", "POST"])
def test3():
return jsonify(name='mjl',age=21)
Flask通过Ajax传输JSON数据
# -- coding: utf-8 --**
from flask import Flask, render_template, request
app = Flask(__name__)
@app.route('/user')
def user():
return render_template('user.html')
#接收JSON数据,编写addUser方法,接收网页发过来的JSON数据
@app.route('/addUser', methods=['POST'])
def login():
json = request.json
print('recv:', json)
return json
if __name__ == '__main__':
app.run(debug=True)
编写user.html,代码如下:
<!DOCTYPE html>
<html>
<body>
<form class="layui-form" id="form_login">
<input type="text" name="username" id="yhm" placeholder="请输入用户名"/>
<input type="password" name="password" id="mm" placeholder="请输入密码"/>
<input type="button" value="登录" onclick="btnSendData()">
</form>
<script type="text/javascript" src="https://cdn.bootcdn.net/ajax/libs/jquery/1.9.1/jquery.min.js"></script>
<script>
function btnSendData() {
var name = document.getElementById("yhm").value;
var password = document.getElementById("mm").value;
var input = {
'name': name,
'password': password
};
$.ajax({
url: '/addUser',
type: 'post',
contentType: 'application/json',
data: JSON.stringify(input),
success: function (res) {
console.log(res);
}
});
}
</script>
</body>
</html>
备注:
1)将input对象转换为JSON字符串发送,所以使用JSON.stringify(input)将发送对象转换为JSON字符串。
2)输入框输入用户名yh1,密码mmm点击【登录】按钮时,发送Ajax请求,注意访问路径为/addUser,请求方式post,内容类型application/json。
flask中request中form、data、json、values属性
理解 flask中request中form、data、json、values属性的区别
flask中request对象中的form、data、json这三个属性其实是flask根据不同的content-type类型将HTTP请求体进行转换而来的数据,这几个属性的类型一般都是字典或者是字典的子类。
data 记录请求的数据,并转换为字符串 ,类型 *
form 记录请求中的表单数据 ,类型 MultiDict
args 记录请求中的查询参数 ,类型 MultiDict
files 记录请求上传的文件 ,类型 *
实例代码
from flask import Flask, request
app = Flask(__name__)
@app.route("/data", methods=["GET", "POST"])
def dataView():
# json 等body提交的非表单数据,读取请求体中数据
rest = request.data
# 表单提交的数据,如果表单中由相同key,默认返回第一个key的参数,
# 如果想要都获得请使用getlist,读取请求体中数据
rest1 = request.form.get("lisi")
# 获取url后传的参数
rest2 = request.args.get("lisi")
# 获取上传的文件对象
pic = request.files.get(("pic"))
# 保存图片
pic.save("./1.png")
print("url传参%s" % rest2)
print("表单提交%s" % rest1)
print("data提交%s" % rest)
return "ok"
if __name__ == '__main__':
app.run(host="0.0.0.0", port=5678)
先简单介绍下args
args
args属性是请求路径中的查询参数,例如:/hello?name=zs, args 解析出来的数据是一个类似字典的对象,它的值是:
args = {"name": 'zx'}
form
form 顾名思义是表单数据,当请求头content-type 是 application/x-www-form-urlencoded 或者是 multipart/form-data 时,请求体的数据才会被解析为form属性。
application/x-www-form-urlencoded 是浏览器的form表单默认使用的content-type。例如
<form action="http://localhost:8000/demo" method="post">
<input type="text" name="username">
<input type="password" name="password">
<button>登录</button>
</form>
发送HTTP请求类似这样:
POST http://localhost:8000/demo HTTP/1.1
Content-Type: application/x-www-form-urlencoded;charset=utf-8
username=zs&password=123456
服务器接收到数据
@app.route("/hello", methods=["GET", "POST"])
def hello():
print("content_type:", request.headers.get("content_type"))
print('form:', request.form)
print('data:', request.data)
return "hello"
打印:
content_type: application/x-www-form-urlencoded
form: ImmutableMultiDict([('username', 'zs'), ('password', '123456')])
data: b''
form的值一个不可变的字典对象,里面的值就是我们提交的表单字段,注意这时data是一个空字符串(byte)
files
当浏览器上传文件时,form表单需要指定 enctype为 multipart/form-data
<form action="http://localhost:8000/demo" method="post" enctype="multipart/form-data">
<input type="text" name="myTextField">
<input type="checkbox" name="myCheckBox">Check</input>
<input type="file" name="myFile">
<button>Send the file</button>
</form>
发送的HTTP请求是这样
POST /demo HTTP/1.1
Host: localhost:8000
User-Agent: Mozilla/5.0 (Macintosh; Intel Mac OS X 10.9; rv:50.0) Gecko/20100101 Firefox/50.0
Accept: text/html,application/xhtml+xml,application/xml;q=0.9,*/*;q=0.8
Accept-Language: en-US,en;q=0.5
Accept-Encoding: gzip, deflate
Connection: keep-alive
Upgrade-Insecure-Requests: 1
Content-Type: multipart/form-data; boundary=---------------------------8721656041911415653955004498
Content-Length: 465
-----------------------------8721656041911415653955004498
Content-Disposition: form-data; name="myTextField"
Test
-----------------------------8721656041911415653955004498
Content-Disposition: form-data; name="myCheckBox"
on
-----------------------------8721656041911415653955004498
Content-Disposition: form-data; name="myFile"; filename="test.txt"
Content-Type: text/plain
Simple file.
-----------------------------8721656041911415653955004498--
请求体用 boundary 分割不同的字段,每个字段以boundary 开始,接着是内容的描述信息,然后是回车换行,最后是内容部分。比如 下面是myTextField 这个字段完整的信息。
-----------------------------8721656041911415653955004498
Content-Disposition: form-data; name="myTextField"
Test
注意,如果表单提交的字段是一个文件,那么该这段里除了content-disposition外,里面还会有一个content-type的字段,来说明该文件的类型。
我们可以用postman模拟一个请求, 指定content-type为 multipart/form-data, 指定test字段的类型为file, 上传的文件名test.md
image-20220806104549571
@app.route("/hello", methods=["GET", "POST"])
def hello():
print(request.headers.get("content_type"))
print("files:", request.files)
return ""
打印
content_type: multipart/form-data; boundary=--------------------------825074346815931435776253
files: ImmutableMultiDict([('test', <FileStorage: 'test.md' ('text/markdown')>)])
意味着当请求头content-type是multipart/form-data,而且请求体中的字段中还有content-type属性时(说明是文件上传),flask会把它当做文件来处理,所以这时候 files 这个属性就有值了。
data
发送的请求体中,当content-type不是multipart/form-data、application/x-www-form-urlencoded 这两种类型时,data才会有值,例如我现在用postman指定的content-type是text/plain
image-20220806105212078
@app.route("/hello", methods=["GET", "POST"])
def hello():
print("content_type:", request.headers.get("content_type"))
print("data:", request.data)
print("form:", request.form)
print("files:", request.files)
return ""
打印结果
content_type: text/plain
data: b'{"name":"zs"}'
form: ImmutableMultiDict([])
files: ImmutableMultiDict([])
form和files都是空,data是一个byte类型的数据
json
如果我将content-type指定为application/json, flask就会将接收到的请求体数据做一次json编码转换,将字符串转换为字典对象,赋值给属性json
image-20220806125019373
@app.route("/hello", methods=["GET", "POST"])
def hello():
print("content_type:", request.headers.get("content_type"))
print("data:", request.data)
print("form:", request.form)
print("json:", request.json)
return ""
打印
content_type: application/json
data: b'{"name":"zs"}'
form: ImmutableMultiDict([])
json: {'name': 'zs'}
files: ImmutableMultiDict([])
get_json()
如果浏览器传过来的是json格式的字符串数据,但是请求头中又没有指定content-type :application/json,如果你直接调用request.json 会直接报错,返回401错误
<!doctype html>
<html>
<title>400 Bad Request</title>
<h1>Bad Request</h1>
<p>Did not attempt to load JSON data because the request Content-Type was not 'application/json'.</p>
这时候我们可以通过get_json方法并指定参数force=True,强制要求做json编码转换,它与 json属性返回的类型是一样的,都是一个字典对象。
image-20220806125455114
@app.route("/hello", methods=["GET", "POST"])
def hello():
print("content_type:", request.headers.get("content_type"))
print("get_json:", request.get_json(force=True))
return "hello"
打印
content_type: text/plain
get_json: {'name': 'zs'}
values
values 是 args 和 form 两个字段的组合
@app.route("/hello", methods=["GET", "POST"])
def hello():
print("content_type:", request.headers.get("content_type"))
print("args:", request.args)
print("form:", request.form)
print("values:", request.values)
return "hello"
打印
content_type: application/x-www-form-urlencoded
args: ImmutableMultiDict([('gender', '1')])
form: ImmutableMultiDict([('name', 'zs')])
values: CombinedMultiDict([ImmutableMultiDict([('gender', '1')]), ImmutableMultiDict([('name', 'zs')])])
总结
这么多属性什么时候有值什么时候没值,其实完全取决于我们请求头content-type是什么,如果是以表单形式multipart/form-data、application/x-www-form-urlencoded 提交的数据,form或者files属性有值,如果是以application/json提交的数据,data、json就有值。而 args 是通过解析url中的查询参数得来的。
python之request post数据的方法
今天学习一下request的几种post方式
一、以data的形式post
import requests
def main():
post_data = {
'type': '',
'name': 'XXX',
'keywords': 'python'
}
url = "https://example.com"
response = requests.post(url, data=post_data)
print(response) # response=<200>说明访问成功
print(response.text) #response.text和浏览器返回数据相同说明post数据成功
if __name__ == '__main__':
main()
二、以Json数据的形式post
import requests
import json
def main():
post_data = {
'type': '',
'name': 'XXX',
'keywords': 'python'
}
url = "https://example.com"
post_data = json.dumps(post_data)
response = requests.post(url, json=post_data)
print(response) # response=<200>说明访问成功
print(response.text) #response.text和浏览器返回数据相同说明post数据成功
if __name__ == '__main__':
main()
补充说明:
1. 若访问不成功,即response不为200首先考虑URL访问请求头,最简单的就是携带User-agent。
headers = {
'user-agent': '复制自己浏览器里的即可',
}
requests.post(url, post_data, headers=headers)
2. 若带上headers还访问不成功,碰到需要认证用户的,一般需要携带cookies,此处是自己登录成功后的cookies
headers = {
'user-agent': '复制自己浏览器里的即可',
'cookie': '复制自己浏览器里的即可',
}
3. 若访问成功,但是浏览器数据返回数据却是空的,可以考虑post的数据无效,那么尝试添加一下content-type
"""
content-type: 1. text/plain;charset=UTF-8
2. application/json;charset:utf-8 --多用于以Json形式传递数据
3. application/x-www-form-urlencoded; charset=UTF-8 --多用于以data形式传递数据
:return:
"""
headers = {
'user-agent': '复制自己浏览器里的即可',
'cookie': '复制自己浏览器里的即可',
'content-type': '不一定非要与浏览器一致,可以试试以上3种',
}
以上就是post数据的方法和可能出现的问题
gradio构建webUI
快速开始
0.安装Gradio
首先你需要安装Python,之后用pip安装Gradio
pip install gradio
1.Hello World
先来个开胃菜,输入一个文本,在他的前面加一句“Hello World”:
import gradio as gr
def print_text(text):
return "Hello World, " + text
interface = gr.Interface(fn=print_text, inputs="text", outputs="text")
interface.launch()
gradio的核心是它的gr.Interface,用来构建可视化界面,其中的参数:
fn:放你用来处理的函数
inputs:写你的输入类型,输入的是文本,所以是"text"
outputs:写你的输出类型,输出的也是文本,所以也是"text"
最后我们用interface.lauch()把页面一发布,一个本地静态交互页面就完成了!
运行这个py脚本,在浏览器输入http://127.0.0.1:7860/,查收你的页面:
2.图像处理:写个简单的RGB转灰度
import gradio as gr
import cv2
def to_black(image):
output = cv2.cvtColor(image, cv2.COLOR_BGR2GRAY)
return output
interface = gr.Interface(fn=to_black, inputs="image", outputs="image")
interface.launch()
这里用到了opencv,需要先pip install opencv-python一下。
同样的逻辑:
fn:放你用来处理的函数
inputs:写你的输入类型,这里输入的是图像,所以是"image"
outputs:写你的输出类型,这里输出的是图像,所以是"image"
对于任何图像处理类的ML(机器学习)代码来说,只要定义好一个图像输入>>模型推理>>返回图片的函数(逻辑和RGB转灰度图本质上没区别),放到fn中,就完事了。
3.增加案例example
我们可以在页面下方添加供用户选择的测试样例。
在gr.Interface里的examples中放入图片路径,格式为[[路径1],[路径2],...]。
import gradio as gr
import cv2
def to_black(image):
output = cv2.cvtColor(image, cv2.COLOR_BGR2GRAY)
return output
interface = gr.Interface(fn=to_black, inputs="image", outputs="image",
examples=[["test.png"]])
interface.launch()
增加example不仅能让你的UI界面更美观,逻辑更完善,也有一些其他意义:
增加Demo体验:比如你做了个文生图的Demo,但是让用户自己想prompt(提示词)的摩擦是很大的,你提供的Example能让用户更快、更轻松体验到你的Demo效果。
3.创建一个外部访问链接
创建外部访问链接非常简单,只需要launch(share=True)即可,在打印信息中会看到你的外部访问链接。
interface.launch(share=True)
免费的链接可以使用24小时,想要长期的话,可以去huggingface创建一个Space,2核16G的CPU Demo是完全免费的,GPU的Demo需要按配置和时长付费。
也可以选择国内的Gradio托管平台:ModelScope 魔搭社区、SwanHub - 创新的AI开源社区
4.升个级:图像分类pytorch+resnet18
前置需要安装torch和torchvision,这个demo推理应该cpu也能跑:
pip install torch torchvision
# 2024.5.1 更新了代码
import gradio as gr
import torch
from torchvision import transforms
import requests
from PIL import Image
model = torch.hub.load('pytorch/vision:v0.6.0', 'resnet18', pretrained=True).eval()
# Download human-readable labels for ImageNet.
response = requests.get("https://git.io/JJkYN")
labels = response.text.split("\n")
def predict(inp):
inp = Image.fromarray(inp.astype('uint8'), 'RGB')
inp = inp.resize((224, 224))
inp = transforms.ToTensor()(inp).unsqueeze(0)
with torch.no_grad():
prediction = torch.nn.functional.softmax(model(inp)[0], dim=0)
return {labels[i]: float(prediction[i]) for i in range(1000)}
inputs = gr.Image()
outputs = gr.Label(num_top_classes=3)
gr.Interface(fn=predict, inputs=inputs, outputs=outputs).launch()
5. 更多技巧
5.1 设置标题和描述
gr.Interface(..., title="Hello_World", description="一个入门Demo")
5.2 设置ip和端口号
gr.launch(server_name="0.0.0.0", server_port=8080)
server_name:设置网页服务的ip地址,如果你想要部署在自己的服务器上的话,最好设置为"0.0.0.0",方便外部访问。
server_port:设置网页服务的端口号
6. 总结
Gradio的最大的价值我认为是缩短了算法与应用的距离,人人都能迅速分享与体验项目成果,不论是分享开源成果,项目汇报,同行交流,甚至是快速做一个产品。
复杂的例子:
import os
import cv2
import gradio as gr
import numpy as np
import random
import base64
import requests
import json
import time
def tryon(person_img, garment_img, seed, randomize_seed):
post_start_time = time.time()
if person_img is None or garment_img is None:
gr.Warning("Empty image")
return None, None, "Empty image"
if randomize_seed:
seed = random.randint(0, MAX_SEED)
encoded_person_img = cv2.imencode('.jpg', cv2.cvtColor(person_img, cv2.COLOR_RGB2BGR))[1].tobytes()
encoded_person_img = base64.b64encode(encoded_person_img).decode('utf-8')
encoded_garment_img = cv2.imencode('.jpg', cv2.cvtColor(garment_img, cv2.COLOR_RGB2BGR))[1].tobytes()
encoded_garment_img = base64.b64encode(encoded_garment_img).decode('utf-8')
url = "http://" + os.environ['tryon_url'] + "Submit"
token = os.environ['token']
cookie = os.environ['Cookie']
referer = os.environ['referer']
headers = {'Content-Type': 'application/json', 'token': token, 'Cookie': cookie, 'referer': referer}
data = {
"clothImage": encoded_garment_img,
"humanImage": encoded_person_img,
"seed": seed
}
try:
response = requests.post(url, headers=headers, data=json.dumps(data), timeout=50)
# print("post response code", response.status_code)
if response.status_code == 200:
result = response.json()['result']
status = result['status']
if status == "success":
uuid = result['result']
# print(uuid)
except Exception as err:
print(f"Post Exception Error: {err}")
raise gr.Error("Too many users, please try again later")
post_end_time = time.time()
print(f"post time used: {post_end_time-post_start_time}")
get_start_time =time.time()
time.sleep(9)
Max_Retry = 12
result_img = None
info = ""
err_log = ""
for i in range(Max_Retry):
try:
url = "http://" + os.environ['tryon_url'] + "Query?taskId=" + uuid
response = requests.get(url, headers=headers, timeout=20)
# print("get response code", response.status_code)
if response.status_code == 200:
result = response.json()['result']
status = result['status']
if status == "success":
result = base64.b64decode(result['result'])
result_np = np.frombuffer(result, np.uint8)
result_img = cv2.imdecode(result_np, cv2.IMREAD_UNCHANGED)
result_img = cv2.cvtColor(result_img, cv2.COLOR_RGB2BGR)
info = "Success"
break
elif status == "error":
err_log = f"Status is Error"
info = "Error"
break
else:
# print(response.text)
err_log = "URL error, pleace contact the admin"
info = "URL error, pleace contact the admin"
break
except requests.exceptions.ReadTimeout:
err_log = "Http Timeout"
info = "Http Timeout, please try again later"
except Exception as err:
err_log = f"Get Exception Error: {err}"
time.sleep(1)
get_end_time = time.time()
print(f"get time used: {get_end_time-get_start_time}")
print(f"all time used: {get_end_time-get_start_time+post_end_time-post_start_time}")
if info == "":
err_log = f"No image after {Max_Retry} retries"
info = "Too many users, please try again later"
if info != "Success":
print(f"Error Log: {err_log}")
gr.Warning("Too many users, please try again later")
return result_img, seed, info
def start_tryon(person_img, garment_img, seed, randomize_seed):
start_time = time.time()
if person_img is None or garment_img is None:
return None, None, "Empty image"
if randomize_seed:
seed = random.randint(0, MAX_SEED)
encoded_person_img = cv2.imencode('.jpg', cv2.cvtColor(person_img, cv2.COLOR_RGB2BGR))[1].tobytes()
encoded_person_img = base64.b64encode(encoded_person_img).decode('utf-8')
encoded_garment_img = cv2.imencode('.jpg', cv2.cvtColor(garment_img, cv2.COLOR_RGB2BGR))[1].tobytes()
encoded_garment_img = base64.b64encode(encoded_garment_img).decode('utf-8')
url = "http://" + os.environ['tryon_url']
token = os.environ['token']
cookie = os.environ['Cookie']
referer = os.environ['referer']
headers = {'Content-Type': 'application/json', 'token': token, 'Cookie': cookie, 'referer': referer}
data = {
"clothImage": encoded_garment_img,
"humanImage": encoded_person_img,
"seed": seed
}
result_img = None
try:
session = requests.Session()
response = session.post(url, headers=headers, data=json.dumps(data), timeout=60)
print("response code", response.status_code)
if response.status_code == 200:
result = response.json()['result']
status = result['status']
if status == "success":
result = base64.b64decode(result['result'])
result_np = np.frombuffer(result, np.uint8)
result_img = cv2.imdecode(result_np, cv2.IMREAD_UNCHANGED)
result_img = cv2.cvtColor(result_img, cv2.COLOR_RGB2BGR)
info = "Success"
else:
info = "Try again latter"
else:
print(response.text)
info = "URL error, pleace contact the admin"
except requests.exceptions.ReadTimeout:
print("timeout")
info = "Too many users, please try again later"
raise gr.Error("Too many users, please try again later")
except Exception as err:
print(f"其他错误: {err}")
info = "Error, pleace contact the admin"
end_time = time.time()
print(f"time used: {end_time-start_time}")
return result_img, seed, info
MAX_SEED = 999999
example_path = os.path.join(os.path.dirname(__file__), 'assets')
garm_list = os.listdir(os.path.join(example_path,"cloth"))
garm_list_path = [os.path.join(example_path,"cloth",garm) for garm in garm_list]
human_list = os.listdir(os.path.join(example_path,"human"))
human_list_path = [os.path.join(example_path,"human",human) for human in human_list]
css="""
#col-left {
margin: 0 auto;
max-width: 430px;
}
#col-mid {
margin: 0 auto;
max-width: 430px;
}
#col-right {
margin: 0 auto;
max-width: 430px;
}
#col-showcase {
margin: 0 auto;
max-width: 1100px;
}
#button {
color: blue;
}
"""
def load_description(fp):
with open(fp, 'r', encoding='utf-8') as f:
content = f.read()
return content
def change_imgs(image1, image2):
return image1, image2
with gr.Blocks(css=css) as Tryon:
gr.HTML(load_description("assets/title.md"))
with gr.Row():
with gr.Column(elem_id = "col-left"):
gr.HTML("""
<div style="display: flex; justify-content: center; align-items: center; text-align: center; font-size: 20px;">
<div>
Step 1. Upload a person image ⬇️
</div>
</div>
""")
with gr.Column(elem_id = "col-mid"):
gr.HTML("""
<div style="display: flex; justify-content: center; align-items: center; text-align: center; font-size: 20px;">
<div>
Step 2. Upload a garment image ⬇️
</div>
</div>
""")
with gr.Column(elem_id = "col-right"):
gr.HTML("""
<div style="display: flex; justify-content: center; align-items: center; text-align: center; font-size: 20px;">
<div>
Step 3. Press “Run” to get try-on results
</div>
</div>
""")
with gr.Row():
with gr.Column(elem_id = "col-left"):
imgs = gr.Image(label="Person image", sources='upload', type="numpy")
# category = gr.Dropdown(label="Garment category", choices=['upper_body', 'lower_body', 'dresses'], value="upper_body")
example = gr.Examples(
inputs=imgs,
examples_per_page=12,
examples=human_list_path
)
with gr.Column(elem_id = "col-mid"):
garm_img = gr.Image(label="Garment image", sources='upload', type="numpy")
example = gr.Examples(
inputs=garm_img,
examples_per_page=12,
examples=garm_list_path
)
with gr.Column(elem_id = "col-right"):
image_out = gr.Image(label="Result", show_share_button=False)
with gr.Row():
seed = gr.Slider(
label="Seed",
minimum=0,
maximum=MAX_SEED,
step=1,
value=0,
)
randomize_seed = gr.Checkbox(label="Random seed", value=True)
with gr.Row():
seed_used = gr.Number(label="Seed used")
result_info = gr.Text(label="Response")
# try_button = gr.Button(value="Run", elem_id="button")
test_button = gr.Button(value="Run", elem_id="button")
# try_button.click(fn=start_tryon, inputs=[imgs, garm_img, seed, randomize_seed], outputs=[image_out, seed_used, result_info], api_name='tryon',concurrency_limit=10)
test_button.click(fn=tryon, inputs=[imgs, garm_img, seed, randomize_seed], outputs=[image_out, seed_used, result_info], api_name=False, concurrency_limit=45)
with gr.Column(elem_id = "col-showcase"):
gr.HTML("""
<div style="display: flex; justify-content: center; align-items: center; text-align: center; font-size: 20px;">
<div> </div>
<br>
<div>
Virtual try-on examples in pairs of person and garment images
</div>
</div>
""")
show_case = gr.Examples(
examples=[
["assets/examples/model2.png", "assets/examples/garment2.png", "assets/examples/result2.png"],
["assets/examples/model3.png", "assets/examples/garment3.png", "assets/examples/result3.png"],
["assets/examples/model1.png", "assets/examples/garment1.png", "assets/examples/result1.png"],
],
inputs=[imgs, garm_img, image_out],
label=None
)
Tryon.queue(api_open=False).launch(show_api=False)
上一篇:Python项目实操笔记
下一篇:MicroPython使用