您现在的位置是:网站首页> .NET Core
Asp.Net Core 入门
- .NET Core
- 2024-05-24
- 928人已阅读
Asp.Net Core 入门
Asp.Net Core 入门(一)——Program.cs做了什么
Asp.Net Core 入门(四)—— Model、View、Controller
Asp.Net Core 入门(五)—— 布局视图_Layout.cshtml
Asp.Net Core 入门(七)—— 安装Bootstrap
Asp.Net Core 入门(八)—— Taghelper
Asp.Net Core 入门(九)—— 环境变量 TagHelper
Asp.Net Core 进阶(一) —— 读取appsettings.json
Asp.Net Core 进阶(二) —— 集成Log4net
Asp.Net Core 进阶(三)—— IServiceCollection依赖注入容器和使用Autofac替换它
Asp.Net Core 进阶(四)—— 过滤器 Filters
Asp.Net Core 入门(一)——Program.cs做了什么
ASP.NET Core 是微软推出的一种全新的跨平台开源 .NET 框架,用于在 Windows、Mac 或 Linux 上生成基于云的新式 Web 应用程序。国内目前关于Asp.Net Core的书比较少,自己靠着阅读微软官方文档,源码和在52ABP梁老师的教程中慢慢的在一点点的积累Asp.Net Core的知识。因此希望将自己的学习记录下来,以此巩固和交流。
闲话不多说,我们知道学习一门新的技术,最好的方法就是从它的启动入口进行跟踪,那么接下来我们先来看下Asp.Net Core的入口文件Program.cs。
笔者使用的.Net SDK 是 2.2版本,所以下面的介绍都是基于2.2版本的。
public class Program
{
public static void Main(string[] args)
{
CreateWebHostBuilder(args).Build().Run();
}
public static IWebHostBuilder CreateWebHostBuilder(string[] args) =>
WebHost.CreateDefaultBuilder(args)
.UseStartup<Startup>();
}
我们看到Program中Main函数很像我们之前的Console应用程序,那么它当中的CreateWebHostBuilder究竟做了什么事情呢?既然.Net Core是开源的,我们看源码就方便了很多,接下来就从源码来了解下它究竟做了什么工作。
/// <summary>
/// Initializes a new instance of the <see cref="WebHostBuilder"/> class with pre-configured defaults.
/// </summary>
/// <remarks>
/// The following defaults are applied to the returned <see cref="WebHostBuilder"/>:
/// use Kestrel as the web server and configure it using the application's configuration providers,
/// set the <see cref="IHostingEnvironment.ContentRootPath"/> to the result of <see cref="Directory.GetCurrentDirectory()"/>,
/// load <see cref="IConfiguration"/> from 'appsettings.json' and 'appsettings.[<see cref="IHostingEnvironment.EnvironmentName"/>].json',
/// load <see cref="IConfiguration"/> from User Secrets when <see cref="IHostingEnvironment.EnvironmentName"/> is 'Development' using the entry assembly,
/// load <see cref="IConfiguration"/> from environment variables,
/// load <see cref="IConfiguration"/> from supplied command line args,
/// configure the <see cref="ILoggerFactory"/> to log to the console and debug output,
/// and enable IIS integration.
/// </remarks>
/// <param name="args">The command line args.</param>
/// <returns>The initialized <see cref="IWebHostBuilder"/>.</returns>
public static IWebHostBuilder CreateDefaultBuilder(string[] args)
{
var builder = new WebHostBuilder();
if (string.IsNullOrEmpty(builder.GetSetting(WebHostDefaults.ContentRootKey)))
{
builder.UseContentRoot(Directory.GetCurrentDirectory());
}
if (args != null)
{
builder.UseConfiguration(new ConfigurationBuilder().AddCommandLine(args).Build());
}
builder.ConfigureAppConfiguration((hostingContext, config) =>
{
var env = hostingContext.HostingEnvironment;
config.AddJsonFile("appsettings.json", optional: true, reloadOnChange: true)
.AddJsonFile($"appsettings.{env.EnvironmentName}.json", optional: true, reloadOnChange: true);
if (env.IsDevelopment())
{
var appAssembly = Assembly.Load(new AssemblyName(env.ApplicationName));
if (appAssembly != null)
{
config.AddUserSecrets(appAssembly, optional: true);
}
}
config.AddEnvironmentVariables();
if (args != null)
{
config.AddCommandLine(args);
}
})
.ConfigureLogging((hostingContext, logging) =>
{
logging.AddConfiguration(hostingContext.Configuration.GetSection("Logging"));
logging.AddConsole();
logging.AddDebug();
logging.AddEventSourceLogger();
}).
UseDefaultServiceProvider((context, options) =>
{
options.ValidateScopes = context.HostingEnvironment.IsDevelopment();
});
ConfigureWebDefaults(builder);
return builder;
}
internal static void ConfigureWebDefaults(IWebHostBuilder builder)
{
builder.UseKestrel((builderContext, options) =>
{
options.Configure(builderContext.Configuration.GetSection("Kestrel"));
})
.ConfigureServices((hostingContext, services) =>
{
// Fallback
services.PostConfigure<HostFilteringOptions>(options =>
{
if (options.AllowedHosts == null || options.AllowedHosts.Count == 0)
{
// "AllowedHosts": "localhost;127.0.0.1;[::1]"
var hosts = hostingContext.Configuration["AllowedHosts"]?.Split(new[] { ';' }, StringSplitOptions.RemoveEmptyEntries);
// Fall back to "*" to disable.
options.AllowedHosts = (hosts?.Length > 0 ? hosts : new[] { "*" });
}
});
// Change notification
services.AddSingleton<IOptionsChangeTokenSource<HostFilteringOptions>>(
new ConfigurationChangeTokenSource<HostFilteringOptions>(hostingContext.Configuration));
services.AddTransient<IStartupFilter, HostFilteringStartupFilter>();
services.AddRouting();
})
.UseIIS()
.UseIISIntegration();
}
从源码中我们可以看到,CreateDefaultBuilder执行的任务有:
1、加载主机和应用程序的配置表信息
2、配置日志记录
3、设置Web服务器
4、设置Asp.Net Core应用程序的托管形式。
现在我们来看一下Asp.Net Core是如何加载配置的。
访问配置信息可以通过 IConfiguration 接口进行访问,我们从源码也可以看到,Asp.Net Core加载配置的过程,它们之间是按照顺序如果有相同的配置会依次被覆盖:appsettings.json,appsettings{Environment}.json(应用程序配置文件) -->User Secrets(用户机密) --> Environment Variables(环境变量) --> Command-line arguments(命令行参数)。
其中应用程序配置文件的{Environment}可以在项目的属性中调试进行配置,如果项目中不存在单独为某个环境配置的,采用appsettings.json。
应用程序配置文件我们比较清楚,以前在.Net Framework我们有web.config,但是Asp.Net Core中出现了User Secrets用户机密,那么它有什么用呢,其实它可以保存我们比较敏感的配置信息,比如第三方的Key,像微信的Appkey之类的。那我们该如何添加User Secrets呢?我们需要在命令行的窗口下,切换到我们项目的执行文件夹下,即bin所在的那层目录,运行命令dotnet user-secrets set [KeyName] [KeyValue]
接着我们就可以在VS项目中查看到该用户机密了
Environment variables(环境变量)在 Properties文件夹下的launchSettings.json进行配置
{
"iisSettings": {
"windowsAuthentication": false,
"anonymousAuthentication": true,
"iisExpress": {
"applicationUrl": "http://localhost:4084",
"sslPort": 44338
}
},
"profiles": {
"IIS Express": {
"commandName": "IISExpress",
"launchBrowser": true,
"environmentVariables": {
"ASPNETCORE_ENVIRONMENT": "Development"
}
},
"StudentManagement": {
"commandName": "Project",
"launchBrowser": true,
"applicationUrl": "https://localhost:5001;http://localhost:5000",
"environmentVariables": {
"ASPNETCORE_ENVIRONMENT": "Development"
}
}
}
}
这里的profiles可以在VS调试运行的时候做选择
而Command-line arguments(命令行参数)需要结合命令行窗口执行: dotnet run KeyName="KeyValue"。
那么我们怎么获取配置信息呢? Asp.Net Core提供了ConfigureAppConfiguration 可以给我们调用获取配置,在StartUp文件中可以使用 _configuration["KeyName"] 来获取。
最后,我们再看一下Asp.Net Core应用程序的托管形式,它有两种托管形式:进程内托管InProcess和进程外托管OutOfProcess。我们知道Asp.Net Core是可以自托管的,它默认托管形式就是InProcess。那么这两种方式的区别是什么呢?
InProcess:配置进程内托管在项目.csproj文件中 <AspNetCoreHostingModel>InProcess</AspNetCoreHostingModel>,在InProcess托管情况下,CreateDefaultBuilder()方法调用UseIIS()方法并在IIS工作进程(w3wp.exe或iisexpress.exe)内托管应用程序,从性能角度,InProcess托管比OutOfProcess托管提供了更高的请求吞吐量。
OutOfProcess:有2个Web服务器-内部Web服务器和外部Web服务器,内部Web服务器是Kestrel,托管进程是dotnet.exe;外部web服务器可以是iis,nginx,apache。
现在我们知道了CreateDefaultBuilder做了什么工作了,那么在它之后调用了UseStartup<Startup>(),那Startup做了什么工作呢,我们下篇再来讨论。
Asp.Net Core 入门(二)——StartUp
上篇介绍了Program.cs中Main做了什么,这篇我们来讨论下Startup.cs它又做了什么呢?
我们新建一个Asp.Net Core Mvc项目,先来开一下Startup的代码
public class Startup
{
public Startup(IConfiguration configuration)
{
Configuration = configuration;
}
public IConfiguration Configuration { get; }
// This method gets called by the runtime. Use this method to add services to the container.
public void ConfigureServices(IServiceCollection services)
{
services.Configure<CookiePolicyOptions>(options =>
{
// This lambda determines whether user consent for non-essential cookies is needed for a given request.
options.CheckConsentNeeded = context => true;
options.MinimumSameSitePolicy = SameSiteMode.None;
});
services.AddMvc().SetCompatibilityVersion(CompatibilityVersion.Version_2_2);
}
// This method gets called by the runtime. Use this method to configure the HTTP request pipeline.
public void Configure(IApplicationBuilder app, IHostingEnvironment env)
{
if (env.IsDevelopment())
{
app.UseDeveloperExceptionPage();
}
else
{
app.UseExceptionHandler("/Home/Error");
// The default HSTS value is 30 days. You may want to change this for production scenarios, see https://aka.ms/aspnetcore-hsts.
app.UseHsts();
}
app.UseHttpsRedirection();
app.UseStaticFiles();
app.UseCookiePolicy();
app.UseMvc(routes =>
{
routes.MapRoute(
name: "default",
template: "{controller=Home}/{action=Index}/{id?}");
});
}
}
Startup包含两个方法,我们先来分析一下ConfigureServices。通过方法上面的注释可以看到,这个方法是被.Net运行时调用的,实际上Asp.Net Core提供了内置的IOC容器,此方法就是用来将我们自己的服务Service注入到Ioc容器当中。那么如何注入呢?当然是利用该方法的参数IServiceCollection进行注入。如果是我们自定义的Service,可以使用services.AddTransient<IStudentRepository,MockStudentRepository>()或其他的两种方式Singleton/Scoped来注入,具体区别看下面代码。如果是注入.Net Core自带的,一般是使用AddMvc,AddCors()。
public void ConfigureServices(IServiceCollection services)
{
//单例注入,创建的对象在所有的地方所有的请求会话创建的都是相同
services.AddSingleton<IStudentRepository, MockStudentRepository>();
//瞬时注入,每次都创建一个新的对象
services.AddTransient<IStudentRepository, MockStudentRepository>();
//作用域注入,创建的对象在同一个请求会话时是相同的
services.AddScoped<IStudentRepository, MockStudentRepository>();
//注入MVC模块,包含MvcCore和常用第三方库的服务和方法
services.AddMvc();
//只包含核心的Mvc功能
services.AddMvcCore();
}
接下来我们来看一下另一个方法Configure。它是用来配置Asp.Net Core Mvc的Http请求管道的。Asp.Net Core的http请求管道与我们之前的Asp.Net Mvc的请求管道有着很大的差别,它引入了中间件的概念,更像是一种责任链的模式。
现在我们就先来分析一下,参数IHostingEnvironment env,顾名思义是web宿主的环境变量相关的。在我们的实际开发中,我们常常会将我们的环境分成:开发环境development,继承环境integration,测试环境testing,预发布环境staging,生产环境production。那这个环境是怎么配置的呢?实际上它是通过 ASPNETCORE_ENVIRONMENT 这个环境变量来配置运行时的环境的。
一般我们的配置遵循:
1、开发机器上,可以在launchingsetting.json文件中设置该环境变量
2、在预发布环境staging或生产环境production下,尽量将该变量设置在操作系统中的环境变量里,因为上篇我们也讲到,Asp.Net Core启动读取变量配置的时候是会依次覆盖的。
3、除了Asp.Net Core提供的development,staging,production外,我们可以定义其他的环境,通过调用 env.IsEnvironment("自定义的环境变量");来判断是否处于此环境。
一般我们可以配置开发环境下显示错误的方式如下面代码。
if (env.IsDevelopment())
{
DeveloperExceptionPageOptions developerExceptionPageOptions = new DeveloperExceptionPageOptions();
developerExceptionPageOptions.SourceCodeLineCount = 50; //异常显示行数
app.UseDeveloperExceptionPage(); //开发者异常页面
}
在我们继续往下看代码之前,先来了解一下Asp.Net Core的中间件这个概念。
中间件是组装到应用程序管道中以处理请求和响应的软件,Asp.Net Core自带了很多的中间件,可以看下下图展示的中间件,可以看到请求经过Logging -> StaticFiles -> MVC后处理完再从MVC -> StaticFiles -> Logging返回给调用方。
其中MVC为终端中间件,终端中间件表示执行完这个中间件的时候就已经结束了,不会再往下调用其他的管道中间件了,这也是我们创建完项目后看到最后一个是app.UseMvc的原因。
关于中间件我们需要注意的:
1、中间件可以同时被访问和请求
2、可以处理请求后,将请求传递给下一个中间件
3、可以处理请求后,使管道短路
4、可以处理传出响应
5、中间件是按照添加的顺序执行的
现在我们来具体分析下Configure里面是怎么配置管道的。IApplicationBuilder app 参数为我们提供了很多扩展方法,通过这些方法可以配置我们的中间件。首先我们来看Asp.Net Core提供的Use,Map,Run方法。
Use方法可以使管道短路(即,可以不调用下一个中间件)。我们再Configure方法中调用app.Use方法,如果我们在该方法中不调用next()方法,那么请求到达该方法就结束返回了,不会再往下一个中间件执行,即后面的Run不会执行。
app.Use(async (context, next) =>
{
context.Response.ContentType = "text/plain;charset=utf-8;"; //解决中文乱码
await context.Response.WriteAsync("这是第一个Hello World");
//await next(); //调用下一个中间件
});
app.Run(async (context) =>
{
//获取当前进程名
await context.Response.WriteAsync( System.Diagnostics.Process.GetCurrentProcess().ProcessName);
});
如果我们放开了next(),则会继续往下执行
再看一下下面的代码
app.Use(async (context, next) =>
{
context.Response.ContentType = "text/plain;charset=utf-8;"; //解决中文乱码
await context.Response.WriteAsync("Use1之前");
await next(); //调用下一个中间件
await context.Response.WriteAsync("Use1之后");
});
app.Use(async (context, next) =>
{
await context.Response.WriteAsync("Use2之前");
await next(); //调用下一个中间件
await context.Response.WriteAsync("Use2之后");
});
app.Run(async (context) =>
{
//获取当前进程名
await context.Response.WriteAsync( System.Diagnostics.Process.GetCurrentProcess().ProcessName);
});
我们可以看到,请求过来后,以链式的方式执行: Use1之前 --> next --> Use2之前 --> next --> Run --> Use2之后 --> Use1之前。
Run方法是一个约定, 并且一些中间件组件可能暴露在管道末端运行的Run [Middleware]方法,如果将Run放在了Configure里面,它也是终端中间件。
app.Run(async (context) =>
{
context.Response.ContentType = "text/plain;charset=utf-8;"; //解决中文乱码
//获取当前进程名
await context.Response.WriteAsync("当前进程名:" + System.Diagnostics.Process.GetCurrentProcess().ProcessName);
});
Map*扩展用作分支管道的约定。映射根据给定的请求路径的匹配来分支请求流水线,如果请求路径以给定路径开始,则执行分支。
private static void HandleMapTest1(IApplicationBuilder app)
{
app.Run(async context =>
{
await context.Response.WriteAsync("Map Test 1");
});
}
private static void HandleMapTest2(IApplicationBuilder app)
{
app.Run(async context =>
{
await context.Response.WriteAsync("Map Test 2");
});
}
app.Map("/map1", HandleMapTest1);
app.Map("/map2", HandleMapTest2);
最后我们再来看一下Asp.Net Core提供的一些其他的中间件。
/*自定义默认页(第一种方式)*/
//DefaultFilesOptions defaultFilesOptions = new DefaultFilesOptions();
//defaultFilesOptions.DefaultFileNames.Clear();
//defaultFilesOptions.DefaultFileNames.Add("custom.html"); //自定义默认页
//app.UseDefaultFiles(defaultFilesOptions);
/**************************************************************************/
/*自定义默认页(第二种方式)*/
//FileServerOptions fileServerOptions = new FileServerOptions();
//fileServerOptions.DefaultFilesOptions.DefaultFileNames.Clear();
//fileServerOptions.DefaultFilesOptions.DefaultFileNames.Add("custom.html");
//app.UseFileServer(fileServerOptions); //集合了UseStaticFiles,UseDefaultFiles,UseDirectoryBrowser
/************************************************/
//app.UseDefaultFiles(); //添加默认文件中间件,必须注册在UseStaticFiles前 index.html index.htm default.html default.htm
app.UseStaticFiles(); //添加静态文件中间件
//app.UseDirectoryBrowser();//暴露项目文件夹,不推荐使用
app.UseMvcWithDefaultRoute();//在请求管道中添加带默认路由的MVC
好了,这篇博文介绍了Startup文件做了哪些事情,其中最重要的就是中间件,那么下一篇就来聊聊Asp.Net Corez中的中间件吧。
Asp.Net Core 入门(三) —— 自定义中间件
上一篇我们讲了Startup文件,其中着重介绍了中间件,现在我们就来自定义我们自己的中间件吧。
中间件通常封装在一个类中,并使用扩展方法进行暴露。它需要拥有一个类型为RequestDelegate的成员变量,通常定义为 private RequestDelegate _next ; 然后通过在构造函数中注入RequestDelegate,还需要有一个Invoke方法供Asp.Net Core调用。
先看代码吧,我们定义了一个日志中间件
using Microsoft.AspNetCore.Http;
using Microsoft.Extensions.Logging;
using System;
using System.Collections.Generic;
using System.Globalization;
using System.Linq;
using System.Threading.Tasks;
namespace WebApplication1.MiddleWare
{
/// <summary>
/// 自定义日志中间件
/// </summary>
public class LoggerMiddleWare
{
private RequestDelegate _next;
public LoggerMiddleWare(RequestDelegate next)
{
_next = next;
}
public async Task Invoke(HttpContext context)
{
context.Response.ContentType = "text/plain;charset=utf-8;";
await context.Response.WriteAsync("this is my custom logger before;");
// Call the next delegate/middleware in the pipeline
await this._next(context);
await context.Response.WriteAsync("this is my custom logger after;");
}
}
}
复制代码
然后通过扩展方法将其暴露出来给ApplicationBuilder调用
复制代码
using Microsoft.AspNetCore.Builder;
using Microsoft.AspNetCore.Http;
using Microsoft.Extensions.Logging;
using System;
using System.Collections.Generic;
using System.Linq;
using System.Threading.Tasks;
using WebApplication1.MiddleWare;
namespace WebApplication1.Extension
{
public static class LoggerMiddlerWareExtension
{
public static IApplicationBuilder UseLogger(this IApplicationBuilder builder)
{
return builder.UseMiddleware<LoggerMiddleWare>();
}
}
}
复制代码
在Startup文件中Configure方法添加如下语句
复制代码
app.UseLogger();
app.Run(async (context) =>
{
await context.Response.WriteAsync(
$"Hello {CultureInfo.CurrentCulture.DisplayName}");
});
运行结果

中间件应该遵循显式依赖原则,通过在其构造函数中暴露其依赖关系。
因为中间件是在应用程序启动时构建的,而不是每个请求,所以在每个请求期间,中间件构造函数使用的作用域生命周期服务不会与其他依赖注入类型共享。 如果需要在中间件和其他类型之间共享作用域服务,请将这些服务添加到Invoke方法的签名中。 Invoke方法可以接受由依赖注入填充的其他参数。
Asp.Net Core 入门(四)—— Model、View、Controller
和我们学习Asp.Net MVC一样,Asp.Net Core MVC的Model、View、Controller也和我们熟悉的Asp.Net MVC中的相似。不同的是我们在使用Asp.Net Core MVC的时候需要注入MVC。
Asp.Net Core MVC注入 MVC 的方法有两种,一种是AddMvcCore(),它只是注入了MVC的一些核心的东西,不包括像返回的ViewResult、JsonResult等,如果要使用完整的MVC,需要使用另一种注入方式 AddMvc() 进行注入,AddMvc()里调用了AddMvcCore()。
下面我们就来详细说说模型、视图、控制器。
我们新建完一个MVC项目后,模板帮我们生成了Models、Views、Controllers三个文件夹,一般我们把新建的Model放在Models中,但实际项目上我们通常会新建一个项目放model。
MVC 中的模型包含一组表示数据的类和管理该数据的逻辑。View和Controller之间可以通过Model来传递数据。 我们定义一个学生类,一个学生仓储接口还有一个该接口的实现。
/// <summary>
/// 学生模型
/// </summary>
public class Student
{
public int Id { get; set; }
public string Name { get; set; }
public string ClassName { get; set; }
public string Email { get; set; }
}
复制代码
public interface IStudentRepository
{
Student GetStudent(int id);
}
复制代码
public class MockStudentRepository : IStudentRepository
{
private List<Student> _studentList;
public MockStudentRepository()
{
_studentList = new List<Student>();
_studentList.AddRange(new List<Student>() {
new Student(){Id=1,Name="张三",ClassName="三年一班",Email="[email protected]"},
new Student(){Id=2,Name="李四",ClassName="三年一班",Email="[email protected]"},
new Student(){Id=3,Name="王五",ClassName="三年一班",Email="[email protected]"},
new Student(){Id=4,Name="赵六",ClassName="三年一班",Email="[email protected]"},
new Student(){Id=5,Name="钱七",ClassName="三年一班",Email="[email protected]"},
});
}
public Student GetStudent(int id)
{
return _studentList.Where(s => s.Id == id).FirstOrDefault();
}
}
复制代码
新建一个HomeController,添加代码
复制代码
private readonly IStudentRepository _studentRepository;
//构造函数注入
public HomeController(IStudentRepository studentRepository)
{
_studentRepository = studentRepository;
}
public IActionResult Index(int id)
{
return View(_studentRepository.GetStudent(id));
}
复制代码
添加视图Index.cshtml
复制代码
@model StudentManagement.Models.Student
@{
ViewData["Title"] = "Index";
}
<div>
@Model.Id
@Model.Name
@Model.ClassName
@Model.Email
</div>
复制代码
我们可以看到,Controller通过Repository获取到Student的数据后将其作为View的参数返回了,而在视图Index我们可以使用@model StudentManagement.Models.Student来引用模型。
当然,将数据传递到视图还有其他的方式,这一点和我们在Asp.Net MVC的时候是一样的,我们可以总结一下:
1、ViewData:弱类型的字典对象,使用string类型的键值对,运行时动态解析,没有智能感知,编译也没有检查类型。
2、ViewBag:ViewData的包装器,都创建了一个弱类型的视图,使用动态属性来存储和查询数据。
3、强类型视图:在视图中使用@model指令指定模型类型,使用@Model访问模型对象属性,提供编译类型检查和智能提示。
需要注意的是,在我们HomeController的构造函数里,形参 IIStudentRepository 是怎么传入的呢?我们知道Asp.Net Core自带了依赖注入容器,在前面讲Startup文件时候知道ConfigureServices方法是用来注入服务的,所以我们需要将我们的 IIStudentRepository 注入进去,否则运行会抛异常。
services.AddTransient<IStudentRepository, MockStudentRepository>();
在返回VIew的时候,上面例子我们传了一个model作为参数,实际上它也可以传递视图名称,在传递视图名称的时候可以使用绝对路径或相对路径,绝对路径必须指定.cshtml文件扩展名,相对路径不用带扩展名.cshtml。
我们定义一个Detail视图,然后调用return View("Detail")
public ObjectResult Detail()
{
return new ObjectResult(_studentRepository.GetStudent(1));
}
return View("Detail");
我们使用的是相对路径,那么.Net Core会执行下面的操作去查找视图
1、在“/ Views / Home /”文件夹中查找,找到就返回,找不到继续往第2步找。
2、在“/ Views / Shared /”文件夹中查找,找到就返回,找不到继续往第3步找。
3、在“/ Pages / Shared /”文件夹中查找, 如果找到视图文件,则视图生成的 HTML 将发送回发出请求的客户端。如果找不到视图文件,将收到错误。
The view 'Detail' was not found
最后,讲一下ViewModel模型视图的一个概念,很多时候我们的视图需要的数据往往比我们定义的Model能提供的数据要多,这时候就可以使用ViewModel了,在实际项目开发中,ViewModel也等于DTO(数据传输对象)。至于ViewModel的使用和Model一样,传递到View中进行显示。
Asp.Net Core 入门(五)—— 布局视图_Layout.cshtml
布局视图和我们在Asp.Net MVC一样,布局视图_Layout.cshtml使得所有视图保持一致的外观变得更加容易,因为我们只有一个要修改的布局视图文件,更改后将立即反映在整个应用程序的所有视图中。
在 ASP.NET Core MVC 中,有一些视图文件,如布局的视图,_ViewStart.cshtml 和_ViewImports.cshtml 等其他.cshtml 文件的文件名以下划线开头,这些文件名中的前下划线表示这些文件不是直接面向浏览器。
我们可以在单个应用程序中包含多个布局视图文件。比如一个布局视图文件服务为管理员用户,另外一个不同的布局视图文件服务于普通用户。
我们一般将布局视图建在Views/Shared文件夹下,以_Layout.cshtml命名。
复制代码
<!DOCTYPE html>
<html>
<head>
<meta name="viewport" content="width=device-width" />
<title>@ViewBag.Title</title>
</head>
<body>
<div>
<!--@RenderBody()是注入视图特定内容的位置。例如,如果使用此布局视图呈现 index.chtml 视图,则会在我们 调用@RenderBody()方法 的位置注入 index.cshtml 视图内容 。-->
@RenderBody()
</div>
@*@if (IsSectionDefined("Scripts"))
{
@RenderSection("Scripts");
}*@
@RenderSection("Scripts", false);
</body>
</html>
复制代码
我们可以在Views/_ViewStart.cshtml指定启用哪个布局页,因为请求的时候会先找到_ViewStart.cshtml。
复制代码
@{
Layout = "_Layout";
}
@if (User.IsInRole("Admin"))
{
Layout = "_AdminLayout";
}
else
{
Layout = "_NoAdminLayout";
}
复制代码
同时,如果我们在很多页面都使用同一个命名空间,同一个model的话,我们可以在Views/_ViewImports.cshtml文件中添加共用的命名空间,model。
复制代码
@using StudentManagement.Models;
@using StudentManagement.ViewModels;
@*还支持以下指令*@
@*
@addTagHelper
@removeTagHelper
@tagHelperPrefix
@model
@inherits
@inject
*@
复制代码
需要注意的是,_ViewStart和_ViewImports是支持分层的,除了将它放在 Views 文件夹中之外,我们还可以在 Views 文件夹的“Home”子文件夹中放置另一个_ViewImports,在文件 Home 的文件夹中的\_ViewImports将覆盖在 Shared 文件夹中的\_ViewImports文件指定的设置。
Asp.Net Core 入门(六)—— 路由
Asp.Net Core MVC的路由在Startup.cs文件中的Configure方法中进行配置,使其加入到Http请求管道中,如果不配置,那么我们所发送的请求无法得到象应。
那么该怎么配置Asp.Net Core MVC的路由呢?通常是在Configure方法最后一行加入 app.UseMvcWithDefaultRoute(); 或者 app.UseMvc();
复制代码
app.UseMvcWithDefaultRoute(); //使用默认路由
app.UseMvc(routes =>
{
routes.MapRoute("default", "{controller=Home}/{action=Index}/{id?}");
});
复制代码
通过此配置使得我们在浏览器可以通过 https://localhost:44338/home/details 来访问到HomeController下的Details这个Action。
上述路由配置是我们熟悉的传统路由,我们也可以通过属性路由来配置,那么属性路由的配置方式是什么样的呢?在Startp.cs文件Configure方法中,我们只使用app.UseMvc();然后在Controller的Action方法上通过特性Route来配置。
复制代码
[Route("")]
[Route("home")]
[Route("/home/index")]
public IActionResult Index(int id)
{
return Json(_studentRepository.GetStudent(id));
//return Json(new { id = 1, name = "张三" });
}
[Route("Home/Details/{id?}")]
public IActionResult Details(int? id)
{
Student model = _studentRepository.GetStudent(id??1);
return View(model);
}
复制代码
这样我们也可以通过浏览器访问
值得提醒的是,使用属性路由 [Route("Home/Details")] 时,这个路由和我们的控制器名称是没有什么关系的,也就是说,如果我们在StudentController这个控制器下的Index Action上应用 [Route("Home/Details")] 配置,在浏览器上使用/home/details一样是可以访问到StudentController的details的,只是如果我们只是直接返回return View(),我们通过浏览器访问会抛出异常,原因是Asp.Net MVC 默认会去/Views/Student/ , /Views/Shared/ , /Pages/Shared/下查找Details.cshtml。解决这个问题也很简单,可以通过使用绝对路径来实现。
return View("~/Views/Home/Details.cshtml",student);
但是,我们发现,使用属性路由的时候,我们需要在每个Action上面添加Route特性,这样如果每个控制器都有很多Action,添加起来就很烦人和繁琐。当然,Asp.Net Core MVC也给我们提供了简写的方式,但依然很繁琐,下面先来看一下
复制代码
[Route("[controller]/[action]")]
public class HomeController : Controller
{
private readonly IStudentRepository _studentRepository;
//构造函数注入
public HomeController(IStudentRepository studentRepository)
{
_studentRepository = studentRepository;
}
[Route("")]
[Route("~/")] //解决 http://localhost:44338/ 访问不了问题
[Route("~/home")] //解决 http://localhost:44338/home 访问不了问题
public IActionResult Index(int id)
{
return Json(_studentRepository.GetStudent(id));
}
[Route("{id?}")]
public IActionResult Details(int? id)
{
Student model = _studentRepository.GetStudent(id??1);
return View(model);
}
public ObjectResult detail()
{
return new ObjectResult(_studentRepository.GetStudent(1));
}
}
}
复制代码
所以我们可以总结一下,在大多数情况下使用传统路由的配置会比较方便,这实际上也是在实际工作中用得比较多的情况,而属性路由相比传统路由有了更大的灵活性,在一些特殊情况上可以使用,更多的是和传统路由搭配。
Asp.Net Core 入门(七)—— 安装Bootstrap
我们使用 libman包管理器来安装,libman是微软推出的最新的包管理器,它是一个轻量级的客户端管理工具,可以从CDN下载客户端库和框架,它要求VS Studio必须在2017版本15.8或更高版本。
我们先来看下怎么使用libman,找到项目的wwwroot,鼠标右键
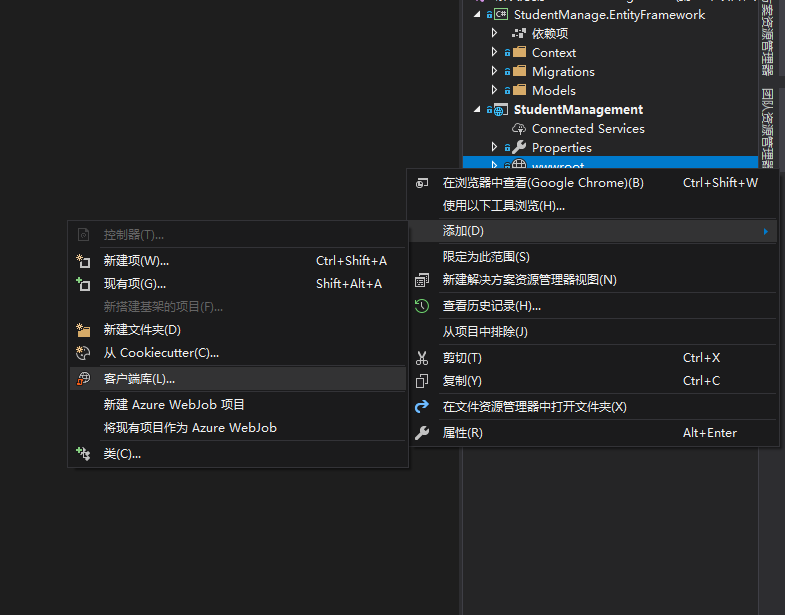
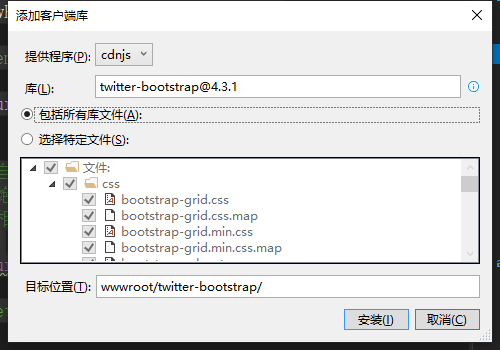
点击安装,然后在项目中可以看到libman.json的文件,在输出-->显示输出来源--> 库管理器可以看到下载的进度。
现在我们来看下 libman.json 库管理器清单文件,provider 可以指定特定的包从哪里下载安装,libman.json使得对客户端库的安装和卸载变得非常简单,右键就可以选择卸载。
{
"version": "1.0",
"defaultProvider": "cdnjs",
"libraries": [
{
"library": "[email protected]",
"destination": "wwwroot/lib/twitter-bootstrap/"
},
{
"provider": "unpkg",
"library": "[email protected]",
"destination": "wwwroot/lib/"
}
]
}
在解决方案的项目中也可以选中libman.json文件后选择清空客户端库和还原客户端库。真的是非常方便。
Asp.Net Core 入门(八)—— Taghelper
Taghelper是一个服务端的组件,可以在Razor文件中创建和渲染HTML元素,类似于我们在Asp.Net MVC中使用的Html Taghelper。Asp.Net Core MVC内置的Tag Helper用于常见的任务,例如生成链接,创建表单,加载数据等。
那么如何导入内置Tag Helpers呢?我们可以在项目的视图导入文件 Views/_ViewImports.cshtml 中引入。
@using StudentManagement.Models
@addTagHelper *,Microsoft.AspNetCore.Mvc.TagHelpers
回顾一下以前在Asp.Net MVC中使用HtmlHelper,我们要使用<a>标签是这样做的
@Html.ActionLink("查看","details","home",new { id=1})
而现在,使用TagHelper变得更方便,我们可以对比一下
<a asp-controller="home" asp-action="details" asp-route-id="1">查看</a>
@Html.ActionLink("查看","details","home",new { id=1})
生成的html也是一样的
复制代码
<!DOCTYPE html>
<html>
<head>
<meta name="viewport" content="width=device-width" />
<title></title>
</head>
<body>
<div>
<a href="/Home/Details/1">查看</a>
<a href="/Home/Details/1">查看</a>
</div>
</body>
</html>
复制代码
那么为什么在Asp.Net Core MVC中要使用TagHelper呢?我们结合路由来看一下,假设路由开始是
app.UseMvc(routes =>
{
routes.MapRoute("default", "{controller=Home}/{action=Index}/{id?}");
});
如果我们使用下面的硬编码方式和TagHelper方式得到的效果是一样的
<a href="/home/index/1" >查看</a>
<a asp-controller="home" asp-action="details" asp-route-id="1">查看</a>
但是如果路由发生了变化,变成了下面的形式
app.UseMvc(routes =>
{
routes.MapRoute("default", "pre/{controller=Home}/{action=Index}/{id?}");
});
那么硬编码的方式就无法访问了,而TagHelper方式依然能够正常访问,因为它是通过映射生成的,会自动加上pre/。
接下来我们再看一下TagHelper里特殊的 Img tag helper。
<img asp-append-version="true" src="~/images/38.jpg" />
Image TagHelper增强了<img>标签,为静态图像文件提供“缓存破坏行为”,它会生成唯一的散列值并将其附加到图片的URL中。此唯一字符串会提示浏览器从服务器重新加载图片,而不是从浏览器缓存重新加载。只有当磁盘上的文件发生更改时,它才会重新计算生成新的哈希值,缓存才会失效。
<img src="/images/38.jpg?v=ae5OTzlW663ZONSxqJlK_Eug8MyjukxUZsk0dwf3O9Y">
Asp.Net Core 入门(九)—— 环境变量 TagHelper
我们在之前讲Program.cs文件做了什么的时候,提到启动CreaeDefaultBuilder会获取环境变量来做一些判断之类的操作。那么我们的Taghelper也可以使用“ASPNETCORE_ENVIRONMENT"变量来设置在什么环境下加载什么库文件。可以通过environment标签来使用。
复制代码
<environment include="Development">
<link href="~/lib/twitter-bootstrap/css/bootstrap.css" rel="stylesheet" />
</environment>
<environment exclude="Staging,Production">
<link href="~/lib/twitter-bootstrap/css/bootstrap.css" rel="stylesheet" />
</environment>
复制代码
include属性接受将单个环境环境名称以逗号分隔的形式生成列表。在<environment>tag helper上,还有exclude属性,当托管环境与exclude属性值中列出的环境名称不匹配时,将呈现标签中的内容。
我们在实际开发过程中,可能开发环境用的是本地的库,生产环境用的是cdn,所以我们可以这么做
复制代码
<environment include="Development">
<link href="~/lib/twitter-bootstrap/css/bootstrap.css" rel="stylesheet" />
</environment>
<environment exclude="Development">
<link href="https://stackpath.bootstrapcdn.com/bootstrap/4.3.1/css/bootstrap.min.css" rel="stylesheet" integrity="sha384-ggOyR0iXCbMQv3Xipma34MD+dH/1fQ784/j6cY/iJTQUOhcWr7x9JvoRxT2MZw1T" crossorigin="anonymous">
</environment>
复制代码
值得注意的是,<link>元素上的”integrity“属性,全称是SubResource Integrity(SRI),用于检查”子资源完整性“,它是一种安全功能,允许浏览器检查被检索的文件是否被恶意更改。
最后总结一下使用环境变量 tag helper,它可以使得我们生产环境在引用的CDN访问失败的情况下,回退到我们指定的另一个源或者本地库。具体做法如下
复制代码
<environment exclude="Development">
<link href="https://stackpath.bootstrapcdn.com/bootstrap/4.3.1/css/bootstrap.min.css" rel="stylesheet" integrity="sha384-ggOyR0iXCbMQv3Xipma34MD+dH/1fQ784/j6cY/iJTQUOhcWr7x9JvoRxT2MZw1T" crossorigin="anonymous"
asp-fallback-href="~/lib/twitter-bootstrap/css/bootstrap.css"
asp-fallback-test-class="sr-only"
asp-fallback-test-property="position"
asp-fallback-test-value="absolute"
asp-suppress-fallback-integrity="true"
>
</environment>
复制代码
使用asp-fallback-href属性指定回退源。asp-fallback-test-class 判断失败时用到的class,asp-fallback-test-property 判断失败时用到的属性,asp-fallback-test-value 判断失败时用到的值。通过将”asp-suppress-fallback-integrity“属性设置为false,就可以关闭浏览器下载的文件完整性检查。
Asp.Net Core 入门(十)—— 模型绑定和验证
模型绑定时将Http请求中的数据映射到控制器操作方法上对应的参数,操作方法中的参数可以是简单类型,如整形,字符串等,也可以是复杂类型,如Product,Order等。
Asp.Net Core MVC的模型绑定和Asp.Net MVC模型绑定相似,模型绑定将按下图指定的顺序查找来自http请求中的数据绑定到控制器操作方法对应的参数上。
同时,Asp.Net MVC Core绑定模型的时候同样也会进行模型的校验。那么,我们怎么给模型添加校验呢,其实也和Asp.Net MVC差不多。
首先我们在模型的属性上添加验证属性,Display属性为显示在页面上的该字段的信息。
复制代码
/// <summary>
/// 学生模型
/// </summary>
public class Student
{
public int Id { get; set; }
[Display(Name="姓名")]
[Required(ErrorMessage ="请输入名字")]
public string Name { get; set; }
[Display(Name = "班级")]
[Required(ErrorMessage ="请输入班级")]
public ClassNameEnum? ClassName { get; set; }
[Display(Name = "邮箱地址")]
[Required(ErrorMessage ="请输入邮箱地址")]
public string Email { get; set; }
}
复制代码
一般的属性校验有:
Required 指定该字段是必填的
Range 指定允许的最小值和最大值
MinLength 指定字符串的最小长度
MaxLength 指定字符串的最大长度
Compare 比较模型的2个属性,例如比较Email和ComfirmEmail属性
RegularExpression 正则表达式,验证提供的值是否与正则表达式指定的模式匹配
其次,使用ModelState.IsValid属性验证属性是否绑定成功
复制代码
if (ModelState.IsValid)
{
Student newStudent = _studentRepository.Add(student);
return RedirectToAction("Details", new { id = newStudent.Id });
}
else
{
return View(student);
}
复制代码
最后,使用asp-validation-for和asp-validation-summary tag helper 来显示错误信息
复制代码
<div asp-validation-summary="All" class="text-danger"></div>
<div class="form-group row">
<label asp-for="Name" class="col-sm-2 col-form-label"></label>
<div class="col-sm-10">
<input asp-for="Name" class="form-control" placeholder="请输入名字" />
<span asp-validation-for="Name" class="text-danger"></span>
</div>
</div>
<div class="form-group row">
<label asp-for="Email" class="col-sm-2 col-form-label"></label>
<div class="col-sm-10">
<input asp-for="Email" class="form-control" placeholder="请输入邮箱" />
<span asp-validation-for="Email" class="text-danger"></span>
</div>
</div>
<div class="form-group row">
<label asp-for="ClassName" class="col-sm-2 col-form-label"></label>
<div class="col-sm-10">
<select asp-for="ClassName" asp-items="Html.GetEnumSelectList<ClassNameEnum>()">
<option value="" selected></option>
</select>
<span asp-validation-for="ClassName" class="text-danger"></span>
</div>
</div>
复制代码
值得注意的是,在select标签的验证上,模型中有Required和无Required都会提示 The value '' is invalid.这是因为枚举ClassName里是int类型,而option里的value为“”,导致类型转化失败,我们可以在Student的ClassName设置为可空类型ClassNameEnum? 。
Asp.Net Core 进阶(一) —— 读取appsettings.json
我们以前在Asp.Net MVC中使用 System.Configuration.ConfigurationManager 来读取web.config文件。但是Asp.Net Core MVC已经没有web.config文件了,它的配置信息一般写在appsettings.json当中,那么我们怎么读取该文件呢?
在Asp.Net Core MVC中使用 Microsoft.Extensions.Options.ConfigurationExtensions 包来读取appsettings.json。具体的操作如下:
使用NuGet添加 Microsoft.Extensions.Options.ConfigurationExtensions 包到我们的项目当中,然后在appsettings.json中添加我们自己的一些配置信息
复制代码
{
"Logging": {
"LogLevel": {
"Default": "Warning"
}
},
"AllowedHosts": "*",
"ConnectionStrings": {
"OpenAuthDBContext": "Data Source=localhost;Initial Catalog=dbname;User=sa;Password=123"
},
"AppSetting": {
"SSOPassport": "http://localhost:52789",
"Version": "1.0", //如果为demo,则屏蔽Post请求
"DbType": "SqlServer", //数据库类型:SqlServer/MySql
"MessageUrl": "http://localhot:23124", //短信平台接口
"MessageType": "CAD71325-0097-4052-9183-56F04EED0B31" //短信类型ID
}
}
复制代码
然后我们新建一个文件AppSetting
复制代码
/// <summary>
/// 配置项
/// </summary>
public class AppSetting
{
public AppSetting()
{
SSOPassport = "http://localhost:52789";
Version = "";
DbType = Define.DBTYPE_SQLSERVER;
}
/// <summary>
/// SSO地址
/// </summary>
public string SSOPassport { get; set; }
/// <summary>
/// 版本信息
/// 如果为demo,则屏蔽Post请求
/// </summary>
public string Version { get; set; }
/// <summary>
/// 数据库类型 SqlServer、MySql
/// </summary>
public string DbType { get; set; }
/// <summary>
/// 短信平台接口Url
/// </summary>
public string MessageUrl { get; set; }
/// <summary>
/// 短信类型
/// </summary>
public string MessageType { get; set; }
}
复制代码
接着在Startup.cs文件的ConfigureServices方法中添加
services.AddOptions();
//映射配置文件
services.Configure<AppSetting>(Configuration.GetSection("AppSetting"));
最后就可以在我们的Controller中使用了,通过IOption<AppSetting>来读取。
复制代码
private readonly IOptions<AppSetting> _setting;
public LoginController(IAuth authUtil,IOptions<AppSetting> setting)
{
_authUtil = authUtil;
_setting = setting;
}
public string GetCaptcha(string phone)
{
string messageUrl = _setting.Value.MessageUrl;
string messageType = _setting.Value.MessageType;
if (_authUtil.GetCaptcha(phone, messageUrl, messageType))
{
return JsonHelper.Instance.Serialize(new { Code = 200, Message = "" });
}
return JsonHelper.Instance.Serialize(new { Code = 500, Message = "验证码获取失败,请稍后重试!" });
}
复制代码
需要注意的是,通过IOption的方式不能在Startup.cs中读取appsettings.json文件,在Startup.cs中读取appsettings.json文件需要使用Microsoft.Extensions.Configuration的IConfiguration。
var dbType = ((ConfigurationSection) Configuration.GetSection("AppSetting:DbType")).Value;
或者使用
var v = Configuration["ASPNETCORE_ENVIRONMENT"];
var d = Configuration["AppSetting:MessageUrl"];
针对格式为下面的json,我么可以通过索引来获取
复制代码
{
"Message": {
"Message1": {
"Name": ""
},
"Message2": {
"Name": ""
}
}
}
复制代码
_configuration["Message:0:Name"]
Asp.Net Core 进阶(二) —— 集成Log4net
Asp.Net Core 支持适用于各种内置日志记录API,同时也支持其他第三方日志记录。在我们新建项目后,在Program 文件入口调用了CreateDefaultBuilder,该操作默认将添加以下日志记录提供程序:ConsoleLogger、DebugLogger、EventSourceLogger。
在工作中笔者使用的最多的日志记录组件是log4net,接下来我们就来看一下在Asp.Net Core中怎么集成 log4net。
首先我们需要添加 log4net 组件,通过Nuget安装 log4net 和 Microsoft.Extensions.Logging.Log4Net.AspNetCore。
接着我们引入配置文件log4net.config,放在项目config文件夹下
复制代码
<?xml version="1.0" encoding="utf-8"?>
<log4net>
<!-- Define some output appenders -->
<appender name="rollingAppender" type="log4net.Appender.RollingFileAppender">
<file value="log\log.txt" />
<!--追加日志内容-->
<appendToFile value="true" />
<!--防止多线程时不能写Log,官方说线程非安全-->
<lockingModel type="log4net.Appender.FileAppender+MinimalLock" />
<!--可以为:Once|Size|Date|Composite-->
<!--Composite为Size和Date的组合-->
<rollingStyle value="Composite" />
<!--当备份文件时,为文件名加的后缀-->
<datePattern value="yyyyMMdd.TXT" />
<!--日志最大个数,都是最新的-->
<!--rollingStyle节点为Size时,只能有value个日志-->
<!--rollingStyle节点为Composite时,每天有value个日志-->
<maxSizeRollBackups value="20" />
<!--可用的单位:KB|MB|GB-->
<maximumFileSize value="3MB" />
<!--置为true,当前最新日志文件名永远为file节中的名字-->
<staticLogFileName value="true" />
<!--输出级别在INFO和ERROR之间的日志-->
<filter type="log4net.Filter.LevelRangeFilter">
<param name="LevelMin" value="ALL" />
<param name="LevelMax" value="FATAL" />
</filter>
<!--必须结合起来用,第一个只过滤出WARN,第二个拒绝其它其它日志输出-->
<!--
<filter type="log4net.Filter.LevelMatchFilter">
<param name="LevelToMatch" value="WARN" />
</filter>
<filter type="log4net.Filter.DenyAllFilter" />-->
<layout type="log4net.Layout.PatternLayout">
<conversionPattern value="%date [%thread] %-5level %logger - %message%newline"/>
</layout>
</appender>
<!-- levels: OFF > FATAL > ERROR > WARN > INFO > DEBUG > ALL -->
<root>
<priority value="ALL"/>
<level value="ALL"/>
<appender-ref ref="rollingAppender" />
</root>
</log4net>
复制代码
然后在Program文件中进行配置日志,如果不需要使用ConsoleLogger,DebugLogger或EventSourceLogger,可以使用ClearProviders方法清空默认的日志记录组件,AddFilter是过滤掉系统自带的System,Microsoft开头的日志,LogLevel。具体做法参考以下代码
复制代码
public static IWebHostBuilder CreateWebHostBuilder(string[] args) =>
WebHost.CreateDefaultBuilder(args)
.ConfigureLogging((context, loggingBuilder) =>
{
//loggingBuilder.ClearProviders();
loggingBuilder.AddFilter("System", LogLevel.Warning);
loggingBuilder.AddFilter("Microsoft", LogLevel.Warning);//过滤掉系统自带的System,Microsoft开头的,级别在Warning以下的日志
loggingBuilder.AddLog4Net("config/log4net.config"); //会读取appsettings.json的Logging:LogLevel:Default级别
})
.UseStartup<Startup>();
复制代码
配置完log4net后,可以使用 ILoggerFactory 或者 ILogger<T> 来记录日志,具体做法如下,其中的ILoggerFactory可以替换成ILogger<Starup>。
复制代码
public void Configure(IApplicationBuilder app, IHostingEnvironment env,ILoggerFactory logFactory)
{
//ILogger logger = logFactory.CreateLogger(typeof(Log4NetLogger));
ILogger logger = logFactory.CreateLogger<Startup>();
logger.LogError("this is the first error");
logger.LogInformation("this is the first info");
logger.LogDebug("this is the first debug");
logger.LogWarning("this is the first warning");
logger.LogInformation(System.Diagnostics.Process.GetCurrentProcess().ProcessName);
}
复制代码
上述是在Startup文件中调用日志,同样的在Controller中也可以调用日志进行记录。
复制代码
private readonly IStudentRepository _studentRepository;
private readonly ILogger<HomeController> _logger;
//构造函数注入
public HomeController(IStudentRepository studentRepository,ILogger<HomeController> logger)
{
_studentRepository = studentRepository;
_logger = logger;
}
复制代码
如果要在Program中创建日志,则需要从DI容器中获取ILogger实列
复制代码
public static void Main(string[] args)
{
var host = CreateWebHostBuilder(args).Build();
var logger = host.Services.GetRequiredService<ILogger<Program>>();
logger.LogInformation("Seeded the database.");
host.Run();
}
Asp.Net Core 进阶(三)—— IServiceCollection依赖注入容器和使用Autofac替换它
Asp.Net Core 提供了默认的依赖注入容器 IServiceCollection,它是一个轻量级的依赖注入容器,所以功能不多,只是提供了基础的一些功能,要实现AOP就有点麻烦,因此在实际工作当中,我们常常会使用第三方依赖注入容器替换掉Asp.Net Core自带的依赖注入容器。
我们先来看下Asp.Net Core自带依赖注入容器IServiceCollection的主要用法,虽然说在工作中经常会被替换掉,但有些情况下使用该自带的就已经足够了,所以自然也就需要先了解它的使用方法。
IServiceCollection依赖注入生命周期和其他大多数依赖注入容器一样,分为 瞬时生命周期、单例和请求单例。我们可以在Startup.cs文件中的ConfigureServices方法中直接使用它。这里我们单独把它拿出来看一下具体怎么使用,我们定义ITestService1,ITestService2,ITestService3,ITestService4以及他们的4个实现类。
复制代码
IServiceCollection container = new ServiceCollection();
container.AddTransient<ITestService1, TestService1>();//瞬时生命周期
container.AddSingleton<ITestService2, TestService2>();//单例:全容器都是一个
container.AddScoped<ITestService3, TestService3>();//请求单例:一个请求作用域是一个实例
container.AddSingleton<ITestService4>(new TestService4());
var provider = container.BuildServiceProvider();
ITestService1 testService1 = provider.GetService<ITestService1>();
ITestService1 testService2 = provider.GetService<ITestService2>();
Console.WriteLine(object.ReferenceEquals(testService1, testService2));//输出 false
ITestService2 testService2_1 = provider.GetService<ITestService2>();
ITestService2 testService2_2 = provider.GetService<ITestService2>();
Console.WriteLine(object.ReferenceEquals(testService2_1, testService2_2));//输出 true
ITestService3 testService3_1 = provider.GetService<ITestService3>();
ITestService3 testService3_2 = provider.GetService<ITestService3>();
Console.WriteLine(object.ReferenceEquals(testService3_1, testService3_2));//输出 true
var scope1 = provider.CreateScope();
var scope2 = provider.CreateScope();
ITestService3 testService3_3 = scope1.ServiceProvider.GetService<ITestService3>();
ITestService3 testService3_4 = scope2.ServiceProvider.GetService<ITestService3>();
Console.WriteLine(object.ReferenceEquals(testService3_3, testService3_4)); //输出 false
ITestService4 testService4_1 = provider.GetService<ITestService4>();
ITestService4 testService4_2 = provider.GetService<ITestService4>();
Console.WriteLine(object.ReferenceEquals(testService4_1, testService4_2)); //输出 true
复制代码
上述代码已经可以很好的阐述了IServiceCollection的用法,但是这些也只是基本的功能,接下来我们就来看下使用Autofac如何替换掉IServiceCollection。
Autofac是一个Microsoft .NET的IoC容器。 它管理类与类之间的依赖关系,使得应用程序层级之间实现了解耦,不至于在应用程序变得越来越复杂的情况下难以修改。
那么现在就一起来看看怎么使用Autofac来替换掉Asp.Net Core自带的依赖注入容器吧,首先先来介绍最常用也是被推荐使用的构造函数注入方式。在Autofac官方文档中有例子可参考。要使用Autofac替换IServiceCollection,我们需要在Startup.cs文件中将ConfigureServices方法的返回值从void修改为 IServiceProvider。
在开始之前,我们需要先从Nuget下载安装Autofac,可以使用如下命令进行安装
Install-Package Autofac.Extensions.DependencyInjection -Version 4.4.0
接下来随便定义两个测试接口和实现类
复制代码
public interface ITestServiceA
{
void Show();
}
public interface ITestServiceB
{
void Show();
}
public class TestServiceA : ITestServiceA
{
public void Show()
{
Console.WriteLine("This is TestServiceA....");
}
}
public class TestServiceB : ITestServiceB
{
public void Show()
{
Console.WriteLine("This is TestServiceB....");
}
}
复制代码
接下来我们修改Startup.cs的ConfigureServices方法
复制代码
// This method gets called by the runtime. Use this method to add services to the container.
public IServiceProvider ConfigureServices(IServiceCollection services)
{
services.Configure<CookiePolicyOptions>(options =>
{
// This lambda determines whether user consent for non-essential cookies is needed for a given request.
options.CheckConsentNeeded = context => true;
options.MinimumSameSitePolicy = SameSiteMode.None;
});
services.AddSession();
services.AddMvc().SetCompatibilityVersion(CompatibilityVersion.Version_2_2);
var containerBuilder = new ContainerBuilder();
containerBuilder.RegisterModule<AutofacInitModule>();
// Populate 方法是最重要的,如果没有调用这个方法,则无法将注入到 IServiceCollection的内置对象填充到autofac中,像控制器注入,Log注入等,程序会报错。
containerBuilder.Populate(services);
var container = containerBuilder.Build();
return new AutofacServiceProvider(container);
}
复制代码
AutofacInitModule类是继承了Autofac.Module类的子类,我们可以重写Load方法进行Autofac的初始化注入,当然也可以直接写在Startup文件的ConfigureServices方法中,单独抽出来会显得不那么臃肿,优雅一些。
复制代码
using Autofac;
namespace WebApplication2
{
internal class AutofacInitModule : Module
{
protected override void Load(ContainerBuilder builder)
{
builder.RegisterType<TestServiceA>().As<ITestServiceA>();
builder.RegisterType<TestServiceB>().As<ITestServiceB>();
// builder.RegisterType<TestServiceA>().As<ITestServiceA>().SingleInstance(); //单例
}
}
}
复制代码
现在我们就可以在Controller中使用了
复制代码
public class HomeController : Controller
{
private readonly ILogger<HomeController> _logger;
private readonly ITestServiceA _serviceA;
private readonly ITestServiceB _serviceB;
public HomeController(ILogger<HomeController> logger, ITestServiceA serviceA, ITestServiceB serviceB)
{
this._logger = logger;
this._serviceA = serviceA;
this._serviceB = serviceB;
}
public IActionResult Index()
{
this._serviceA.Show();
this._serviceB.Show();
this._logger.LogWarning("this is logger....");
return View();
}
}
复制代码
运行程序,可以看到_logger、_serviceA、_serviceB都成功的被创建了。
那么上述是使用的autofac的构造函数注入,虽然是最被推荐的也是最常用的注入方式,但是autofac也提供了属性注入的方式,下面我们也了解一下。
修改Startup.cs的ConfigureServices方法和AutofaceInitModule类
复制代码
// This method gets called by the runtime. Use this method to add services to the container.
public IServiceProvider ConfigureServices(IServiceCollection services)
{
services.Configure<CookiePolicyOptions>(options =>
{
// This lambda determines whether user consent for non-essential cookies is needed for a given request.
options.CheckConsentNeeded = context => true;
options.MinimumSameSitePolicy = SameSiteMode.None;
});
services.AddSession();
services.AddMvc().SetCompatibilityVersion(CompatibilityVersion.Version_2_2).AddControllersAsServices();
var containerBuilder = new ContainerBuilder();
// Populate 方法是最重要的,如果没有调用这个方法,则无法将注入到 IServiceCollection的内置对象填充到autofac中,像控制器注入,Log注入等,程序会报错。
containerBuilder.Populate(services);
containerBuilder.RegisterModule<AutofacInitModule>();
var container = containerBuilder.Build();
return new AutofacServiceProvider(container);
}
复制代码
复制代码
using Autofac;
using Microsoft.AspNetCore.Mvc;
using System.Linq;
namespace WebApplication2
{
internal class AutofacInitModule : Module
{
protected override void Load(ContainerBuilder builder)
{
//注册服务
builder.RegisterType<TestServiceA>().As<ITestServiceA>().PropertiesAutowired();
builder.RegisterType<TestServiceB>().As<ITestServiceB>().PropertiesAutowired();
//注册所有控制器
var controllersTypesInAssembly = typeof(Startup).Assembly.GetExportedTypes()
.Where(type => typeof(ControllerBase).IsAssignableFrom(type)).ToArray();
builder.RegisterTypes(controllersTypesInAssembly).PropertiesAutowired();
// builder.RegisterType<TestServiceA>().As<ITestServiceA>().SingleInstance(); //单例
}
}
}
复制代码
需要注意的是 services.AddMvc().SetCompatibilityVersion(CompatibilityVersion.Version_2_2).AddControllersAsServices();和
containerBuilder.Populate(services);需要写在注入服务之前,属性注入才能成功。
复制代码
public class HomeController : Controller
{
//private readonly ILogger<HomeController> _logger;
//private readonly ITestServiceA _serviceA;
//private readonly ITestServiceB _serviceB;
public ILogger<HomeController> Logger { get; set; }
public ITestServiceA ServiceA { get; set; }
public ITestServiceB ServiceB { get; set; }
//public HomeController(ILogger<HomeController> logger, ITestServiceA serviceA, ITestServiceB serviceB)
//{
// this._logger = logger;
// this._serviceA = serviceA;
// this._serviceB = serviceB;
//}
public IActionResult Index()
{
//this._serviceA.Show();
//this._serviceB.Show();
//this._logger.LogWarning("this is logger....");
Logger.LogWarning(ServiceA.Show());
Logger.LogWarning(ServiceB.Show());
return View();
}
}
复制代码
运行可以看到成功的结果
最后,在一开始之前,我们提到Asp.Net Core自带的依赖注入容器在实现AOP的功能很麻烦,在工作中常常会替换成第三方的依赖注入容器,那么现在我们再来看一下autofac怎么实现AOP。
Autofac实现AOP需要引入Autofac.Extras.DynamicProxy库,通过Nuget添加该库
Install-Package Autofac.Extras.DynamicProxy -Version 4.5.0
接着为了实现AOP,我们定义如下类和接口
复制代码
using Autofac.Extras.DynamicProxy;
using Castle.DynamicProxy;
using Microsoft.Extensions.Logging;
using System;
using System.Collections.Generic;
using System.Linq;
using System.Threading.Tasks;
namespace WebApplication2
{
public class AutofacTestAop : IInterceptor
{
public void Intercept(IInvocation invocation)
{
Console.WriteLine($"invocation.Methond={invocation.Method}, invocation.Arguments={string.Join(",", invocation.Arguments)}");
invocation.Proceed(); //继续执行TestAop.Show
Console.WriteLine($"Method {invocation.Method} Excuted");
}
}
public interface ITestAop
{
void Show();
}
[Intercept(typeof(AutofacTestAop))]
public class TestAop : ITestAop
{
private ILogger<TestAop> _logger;
public TestAop(ILogger<TestAop> logger)
{
this._logger = logger;
}
public void Show()
{
this._logger.LogWarning("this is TestAop .....");
}
}
}
复制代码
AutofacTestAop为实现了IInterceptor的类,它的Intercept方法就是用来做AOP的调用的。除了实现这个方法外,在需要添加AOP功能的类上需要添加特性 [Intercept(typeof(AutofacTestAop))] 。最后需要在AutofacInitModule中配置一下启用 EnableInterfaceInterceptors。
复制代码
using Autofac;
using Autofac.Extras.DynamicProxy;
using Microsoft.AspNetCore.Mvc;
using System.Linq;
namespace WebApplication2
{
internal class AutofacInitModule : Module
{
protected override void Load(ContainerBuilder builder)
{
//注册服务
builder.RegisterType<TestServiceA>().As<ITestServiceA>();
builder.RegisterType<TestServiceB>().As<ITestServiceB>();
builder.Register(c => new AutofacTestAop());
builder.RegisterType<TestAop>().As<ITestAop>().EnableInterfaceInterceptors();
// builder.RegisterType<TestServiceA>().As<ITestServiceA>().SingleInstance(); //单例
}
}
}
复制代码
最后在HomeController中调用ITestAop的Show方法就会先执行AutofacTestAop里的Intercept方法了。
Asp.Net Core 进阶(四)—— 过滤器 Filters
一、介绍
Asp.Net Core Filter 使得可以在请求处理管道的特定阶段的前后执行代码,我们可以创建自定义的 filter 用于处理横切关注点。 横切关注点的示例包括错误处理、缓存、配置、授权和日志记录。 filter 使得可以避免重复代码。
Asp.Net Core 提供了5中过滤器类型,分别是:
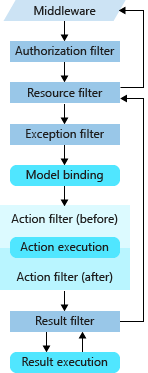
1、Authorization filters,授权过滤器是最先执行并且决定请求用户是否经过授权认证,如果请求未获授权,授权过滤器可以让管道短路。
2、Resource filters,资源过滤器在Authorization filter执行完后执行,它有两个方法,OnResourceExecuting可以在filter管道的其余阶段之前运行代码,例如可以在模型绑定之前运行。OnResourceExecuted则可以在filter管道的其余阶段之后运行代码
3、Action filters,操作过滤器可以在调用单个操作方法之前和之后立即运行代码,它可以用于处理传入某个操作的参数以及从该操作返回的结果。 需要注意的是,Aciton filter不可以在 Razor Pages 中使用。
4、Exception filters,异常过滤器常常被用于在向响应正文写入任何内容之前,对未经处理的异常应用全局策略。
5、Result filters,结果过滤器可以在执行单个操作结果之前和之后运行代码。 但是只有在方法成功执行时,它才会运行。
至于它们在filter管道中的交互方式可以看下图。
二、实现
Asp.Net Core提供了同步和异步两种filter接口定义,通过实现不同的接口可以实现同步或异步的过滤器,但是如果一个类同时实现了同步和异步的接口,Asp.Net Core的filter 管道只会调用异步的方法,即异步优先。具体的做法可以参考微软官方文档 https://docs.microsoft.com/en-us/aspnet/core/mvc/controllers/filters?view=aspnetcore-2.2。
以下是IActionFilter和IAsyncActionFilter的实现
复制代码
public class MySampleActionFilter : IActionFilter
{
public void OnActionExecuting(ActionExecutingContext context)
{
// Do something before the action executes.
}
public void OnActionExecuted(ActionExecutedContext context)
{
// Do something after the action executes.
}
}
public class SampleAsyncActionFilter : IAsyncActionFilter
{
public async Task OnActionExecutionAsync(
ActionExecutingContext context,
ActionExecutionDelegate next)
{
// Do something before the action executes.
// next() calls the action method.
var resultContext = await next();
// resultContext.Result is set.
// Do something after the action executes.
}
}
复制代码
除了直接实现Filter接口,Asp.Net Core同时提供了一些基于特性的过滤器,我们可以继承相应的特性来实现自定义的过滤器。这些特性包括ActionFilterAttribute、ExceptionFilterAttribute、ResultFilterAttribute、FormatFilterAttribute、ServiceFilterAttribute、TypeFilterAttribute。
下面是微软文档的一个例子,在Result Filter给响应添加Header。
复制代码
public class AddHeaderAttribute : ResultFilterAttribute
{
private readonly string _name;
private readonly string _value;
public AddHeaderAttribute(string name, string value)
{
_name = name;
_value = value;
}
public override void OnResultExecuting(ResultExecutingContext context)
{
context.HttpContext.Response.Headers.Add( _name, new string[] { _value });
base.OnResultExecuting(context);
}
}
[AddHeader("Author", "Joe Smith")]
public class SampleController : Controller
{
public IActionResult Index()
{
return Content("Examine the headers using the F12 developer tools.");
}
[ShortCircuitingResourceFilter]
public IActionResult SomeResource()
{
return Content("Successful access to resource - header is set.");
}
}
复制代码
三、Filter 的作用域和执行顺序
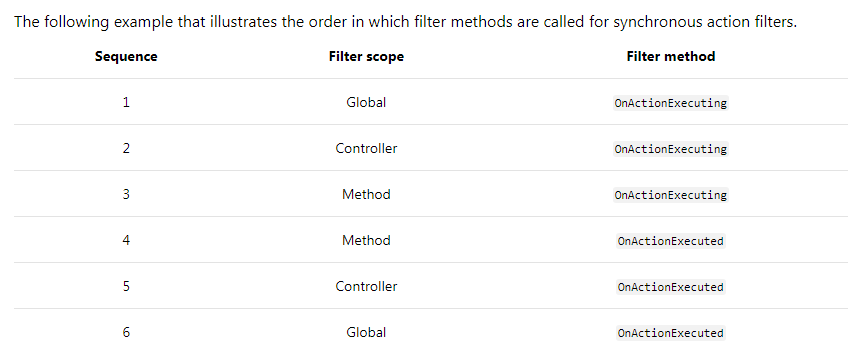
可以将我们自定义的filter添加到我们的代码中进行调用,添加的方式有三种,对应其三个作用域:在Action上添加特性、在Controller上添加特性和添加全局filter。
下面先来看下添加全局filter的做法,我们知道,在Asp.Net MVC中,filter都是在控制器实例化之后才能生效的,其Filter应该是确定的,不能被注入参数,但是到了Asp.Net Core,全局注册是在ConfigureServices方法中完成的,它可以被注入参数。
复制代码
public void ConfigureServices(IServiceCollection services)
{
services.Configure<CookiePolicyOptions>(options =>
{
// This lambda determines whether user consent for non-essential cookies is needed for a given request.
options.CheckConsentNeeded = context => true;
options.MinimumSameSitePolicy = SameSiteMode.None;
});
services.AddMvc(options =>
{
options.Filters.Add(new AddHeaderAttribute("name", "Jesen"));
options.Filters.Add(typeof(AddLogActionAttribute));
options.Filters.Add(typeof(ExceptionHandlerAttribute));
}).SetCompatibilityVersion(CompatibilityVersion.Version_2_2);
}
复制代码
上述代码在addMvc中将我们自定义的 filter 添加到全局当中,这样对所有的控制器和action都产生了作用。而其他两种作用域的用法就是直接将特性添加到其上面。
复制代码
[AddHeader("", "")]
public class HomeController : Controller
{
[AddLogAction]
public IActionResult Index()
{
return View();
}
}
复制代码
那么这三种作用域的默认执行顺序是怎样的,下图很好的进行了展示。
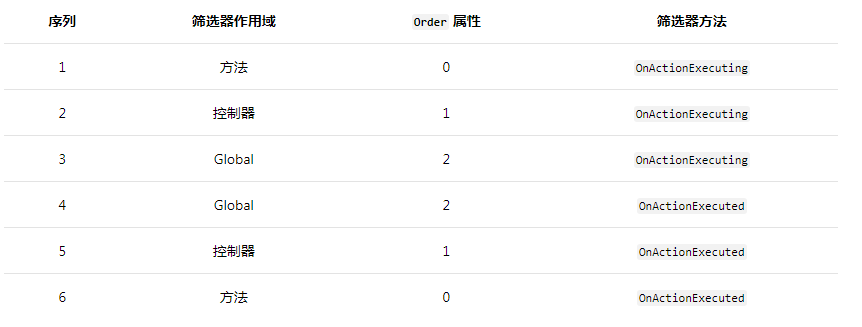
那么我们是否可以改变其默认执行顺序呢,答案当然是肯定的。我们可以通过实现 IOrderFilter来重写默认执行序列。 IOrderedFilter 公开了Order 属性来确定执行顺序,该属性优先于作用域。 具有较低的 Order 值的 filter 在具有较高的 Order 值的filter之前运行 before 代码,在具有较高的 Order 值的 filter 之后运行 after 代码。具体做法可以在使用构造函数参数时设置Order 属性。
[CustomFilter(Name = "Controller Level Attribute", Order=1)]
在改变了Order属性后的执行顺序如下图所示
四、依赖注入
在前面添加filter事,我们在全局添加方式中知道了 filter 可以通过类型添加,也可以通过实例添加,通过实例添加,则该实例会被应用于所有的请求,按照类型添加则将激活该类型,这意味着它会为每个请求创建一个实例,依赖注入将注入所有构造函数的依赖项。
但是如果通过特性添加到Controller或者Action上时,该 filter 不能由依赖注入提供构造函数依赖项,这是因为特性在添加时必须提供它的构造函数参数,这是由于特性的原理决定的。那是不是通过Controller或Action的特性不能有构造函数参数呢,肯定不是的,可以通过以下特性来获得依赖注入:ServiceFilterAttribute、TypeFilterAttribute和在特性上实现 IFilterFactory。
复制代码
namespace FilterDemo.Filter
{
public class AddLogActionAttribute : ActionFilterAttribute
{
private readonly ILogger _logger;
public AddLogActionAttribute(ILoggerFactory loggerFactory)
{
this._logger = loggerFactory.CreateLogger<AddLogActionAttribute>();
}
public override void OnActionExecuting(ActionExecutingContext context)
{
string controllerName = (string)context.RouteData.Values["controller"];
string actionName = (string)context.RouteData.Values["action"];
this._logger.LogInformation($"{controllerName}的{actionName}开始执行了...")
base.OnActionExecuting(context);
}
public override void OnActionExecuted(ActionExecutedContext context)
{
base.OnActionExecuted(context);
}
}
}
复制代码
上述代码我们定义了带Logger参数的AddLogActionAttribute Filter,接下来实现怎么在Controller或Action上使用,首先在Startup中添加注入
services.AddScoped<AddLogActionAttribute>();
然后在Controller或Action上使用 ServiceFilter
[ServiceFilter(typeof(AddLogActionAttribute))]
public class HomeController : Controller
TypeFilterAttribute与ServiceFilterAttribute类似,但不会直接从 DI 容器解析其类型。 它使用 Microsoft.Extensions.DependencyInjection.ObjectFactory 对类型进行实例化。因为不会直接从 DI 容器解析 TypeFilterAttribute 类型,所以使用 TypeFilterAttribute 引用的类型不需要注册在 DI 容器中。
[TypeFilter(typeof(AddLogActionAttribute))]
public IActionResult Index()
{
return View();
}
五、Resource Filter
最后,我们来看一下Asp.Net Core不同于之前Asp.Net MVC的 ResourceFilter,在上述介绍中,我们知道了Resource Filter在Authorization Filter执行之后执行,然后才会去实例化控制器,那么Resource Filter 就比较适合用来做缓存,接下来我们自定义一个Resource Filter。
复制代码
using Microsoft.AspNetCore.Mvc;
using Microsoft.AspNetCore.Mvc.Filters;
using System;
using System.Collections.Generic;
using System.Linq;
using System.Threading.Tasks;
namespace FilterDemo.Filter
{
public class CacheResourceFilterAttribute : Attribute, IResourceFilter
{
private static readonly Dictionary<string, object> _Cache = new Dictionary<string, object>();
private string _cacheKey;
/// <summary>
/// 控制器实例化之前
/// </summary>
/// <param name="context"></param>
public void OnResourceExecuting(ResourceExecutingContext context)
{
_cacheKey = context.HttpContext.Request.Path.ToString();
if (_Cache.ContainsKey(_cacheKey))
{
var cachedValue = _Cache[_cacheKey] as ViewResult;
if (cachedValue != null)
{
context.Result = cachedValue; //设置该Result将是filter管道短路,阻止执行管道的其他阶段
}
}
}
/// <summary>
/// 把请求都处理完后执行
/// </summary>
/// <param name="context"></param>
public void OnResourceExecuted(ResourceExecutedContext context)
{
if (!String.IsNullOrEmpty(_cacheKey) &&
!_Cache.ContainsKey(_cacheKey))
{
var result = context.Result as ViewResult;
if (result != null)
{
_Cache.Add(_cacheKey, result);
}
}
}
}
}
复制代码
将其添加到HomeController的Index上
复制代码
[CacheResourceFilter]
[TypeFilter(typeof(AddLogActionAttribute))]
public IActionResult Index()
{
return View();
}
复制代码
运行可以发现第一次请求按照默认顺序执行,第二次请求会在Cache中查找该请求路径是否已经在Cache当中,存在则直接返回到Result,中断了请求进入管道的其他阶段。
上一篇:.NET Core 基础知识